How to Use Netgear Nighthawk M1 Gigabit Router

This chapter provides an overview of Netgear Nighthawk M1 4GX Gigabit LTE Mobile Router features and instructions for how to set up your mobile router and connect to the Internet.

The chapter covers the following topics:

  • Get to Know Your Mobile Router
  • Install the SIM Card and the Battery
  • Download the NETGEAR Mobile App
  • Power On Your Mobile Router
  • Use the NETGEAR Mobile App to Set Up the Mobile Router
  • External Antennas


Get to Know Your Mobile Router

Your mobile router lets you create a WiFi access point in any location with cellular network coverage. Use a WiFi access point to connect your computer or mobile devices to your service provider’s mobile broadband network and connect to the Internet.

  • Rechargeable battery included with the mobile router
  • Wall socket using the AC adapter and USB cable
  • USB port on your computer Your mobile router can receive power from any of the following sources:


Top Front View

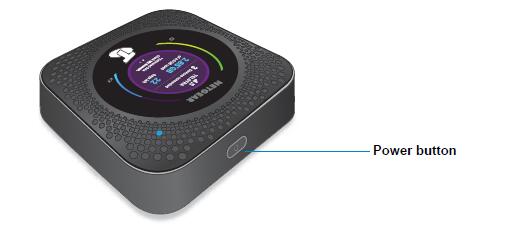
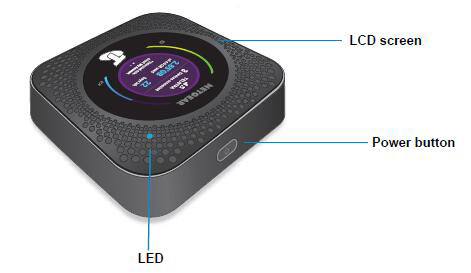
The following figure shows the top front view of the mobile router.


Power Button

Use the Power button to wake the mobile router and to power the device on and off.


Desired Result Action
Turn on the mobile router. Press and hold the Power button for three seconds.
Turn off the mobile router. Press and hold the Power button for five seconds.
Wake the router. Press and quickly release the Power button.
Switch between screens. Press and quickly release the Power button.


Status LED

The LED indicates the device’s connection status.

LED What the Pattern Means
Slow blue blink The Nighthawk M1 router is ready.
Fast blue blink The Nighthawk M1 router is transferring data.
Slow amber blink The Nighthawk M1 router is not ready.


LCD Screen

The LCD screen displays information shown in the following figure.


Rear View

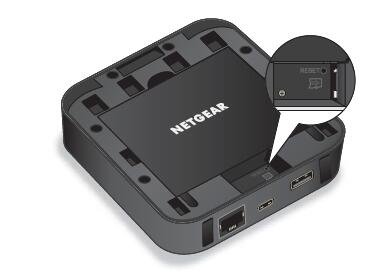
The following figure shows the rear view of the mobile router.

The mobile router rear panel includes the following ports:

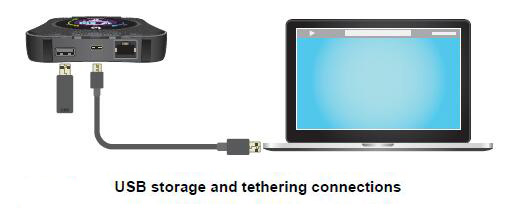
  • USB type A port. Connect a USB storage device or charge a smartphone.

For information about USB storage devices, see Connect a USB Storage Device in the article Netgear M1 Share Media and Storage.

For information about charging a smartphone, see see Use the Mobile Router to Jump Boost Another Device in How to Manage Netgear MR1100 Router Battery Usage and Charging.

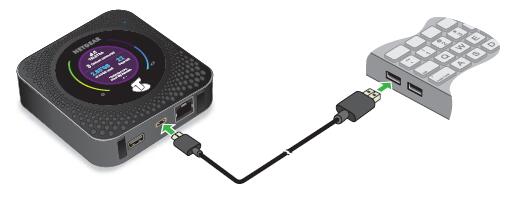
  • USB type C port. Connect the USB type-C cable that came in the package to recharge the battery or for a tethered connection to a computer.

For more information about recharging the battery, see Recharge the Battery From a Wall Socket  and Recharge the Battery From a Computer USB Port in the article How to Manage Netgear MR1100 Router Battery Usage and Charging. .

A tethered connection to a computer lets you access the mobile router from a web browser without a WiFi connection. See Tethered Connection in How to Connect to the Netgear M1 Nighthawk Mobile Router.

  • Ethernet port. You can connect an Ethernet device to this port and you can offload your mobile Internet data. The Ethernet connection speed is about 500 Mbps.

When you are using an Ethernet connection, you can use the USB type C cable and the AC adapter to recharge the mobile router battery.

Note: You cannot use an Ethernet connection and use a tethered connection to access the mobile router at the same time.


For information about offloading data, see Offload Your Mobile Internet Connection in Manage Netgear M1 Internet Connection.

For information about how to use a charge-only tethered connection, see Use the USB Type C Cable to Charge Only in How to Manage Battery Usage and Charging.


Optional Accessories

The following optional accessories are also supported:

  • Optional micro SD card (sold separately)
  • Optional antennas (sold separately)

For more information, visit netgear.com/telstraaccessories.


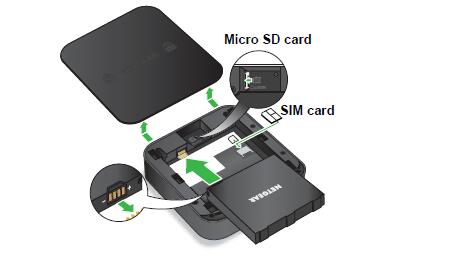
Install the SIM Card and the Battery

To install the SIM card and the battery:

To obtain an activated micro SIM (3FF format) card, contact Telstra.

  1. Make sure that power to the mobile router is off.
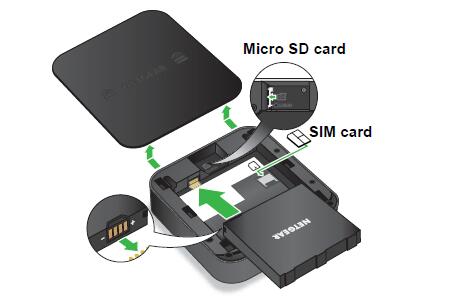
  2. Remove the cover on the bottom of the mobile router.

Place your thumbs on the arrows on the cover and press down while sliding the cover up.

  1. Carefully slide the micro SIM card into the slot.
  2. Align the battery connectors and insert the battery.
  3. If you purchased a micro SD card, insert the card into the micro SD slot.
  4. Replace the mobile router cover.


Download the NETGEAR Mobile App

The NETGEAR Mobile app lets you set up the mobile router. After initial setup, you can use the app to view or change the mobile router settings. You can also use it to enable Arlo support, play and share media, and enable the travel router feature.

To download the NETGEAR Mobile app:

  1. Connect your mobile device to the Internet.
  2. Open a web browser.
  3. Visit http://netgear.com/mobileapp.
  4. Download the NETGEAR Mobile app.


Power On Your Mobile Router

To power on your mobile router:

  1. Press the Power button on your mobile router.

The LED lights blue.

  1. To view the WiFi name and password, press and release the Power button to toggle through the Nighthawk M1 router LCD displays.


Use the NETGEAR Mobile App to Set Up the Mobile Router

To set up the mobile router:

You must use the NETGEAR Mobile app to set up the mobile router.

  1. Launch the NETGEAR Mobile app.

The app prompts you to change the password for the admin user name and to change the WiFi name and WiFi password.

Note: The default password for the admin user name is admin. We strongly recommend that you change this password to a more secure password.

  1. Follow the onscreen instructions to set up your mobile router.


External Antennas

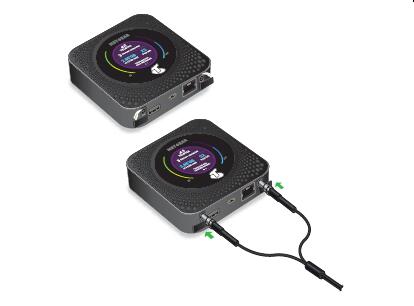
Using an external antenna might be recommended in areas of lower coverage to improve your device performance. MIMO Dual TS9 antennas are available from your retailer. Insert the connector carefully to avoid damage to your device.

How to Manage Netgear MR1100 Router Battery Usage and Charging

This chapter introduces some simple application and setting for Netgear Nighthawk MR1100, including the following sections:

  • Extend Battery Life
  • Change the LCD Screen Display
  • Recharge the Battery
  • Use the Mobile Router to Jump Boost Another Device
  • Battery Tips
  • General Battery Safety
  • Appropriate Batteries and Chargers
  • Battery Disposal


Extend Battery Life

The mobile router, by default, is configured to optimize battery life. If your mobile router is plugged in for an extended period of time, the mobile router automatically reduces charging levels to help protect battery life.

The following factors affect battery life:

  • Standby time
  • Data throughput
  • Mobile broadband signal strength (the better the signal, the longer the battery life)
  • Dual-band WiFi (when all of your devices support 5 GHz WiFi, dual-band WiFi allows faster downloads but uses more power)
  • Guest WiFi, when enabled, uses more power.


To extend the battery life, use any of the following methods:

  • Adjust WiFi settings.
  • Adjust display settings.
  • Use a tethered USB connection to your computer.
  • WiFi range


Change the LCD Screen Display

You can change the brightness and the time-out for the LCD.

Change the LCD Screen Time-Out and Brightness From the NETGEAR Mobile App

To change the LCD screen time-out and brightness:

  1. On your smartphone, connect to the mobile router’s WiFi network.
  2. Launch the NETGEAR Mobile app.
  3. Swipe down.The dashboard displays.
  4. Tap Settings.The Settings page displays.
  5. To change the screen time-out, select the number of minutes for the screen time-out.
  6. To change the screen brightness, move the slider.


Change the LCD Screen Time-Out and Brightness From a Web Browser

To change the screen time-out:

  1. From a computer that is connected to your network, launch a web browser.
  2. Enter http://m.home or http://192.168.1.1. A login page displays.
  3. Enter the administrator login password. The password is case-sensitive.The dashboard displays.
  4. Select Settings > Advanced Settings > Device.The Device page displays.
  5. To change the screen time-out, select the number of minutes for the screen time-out.
  6. To change the screen brightness, move the slider.
  7. Click the Apply button. Your settings are saved.


Recharge the Battery

The battery comes partially charged. You can recharge the battery from a wall socket or from the USB port on your computer. Recharging from a wall socket is faster than recharging from a USB port. The mobile router supports Quick Charge 2.0 technology. You can charge the mobile router with a Quick Charge–certified adapter, which charges the battery up to 75 percent faster than regular power adapters.

Turn off USB tethering if you only want to charge your mobile router with your computer. For more information, see Turn Off USB Tethering in Internal Access Control.


Recharge the Battery from a Wall Socket

To recharge the battery from a wall socket:

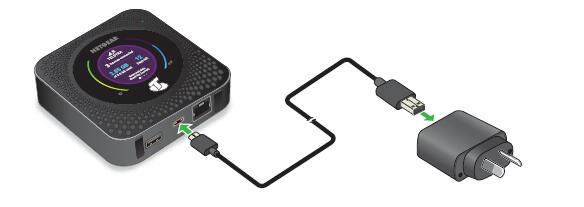
  1. Attach one end of the micro USB cable to the connector on the right on the mobile router and attach the other end to the wall charger (included).
  2. Plug the wall charger into a wall socket. A lightning bolt appears on the Battery icon when the battery is charging. The Battery icon on the LCD indicates when the battery is fully charged and a notification displays.

Note: The battery continues to charge when the mobile router is powered off.


If your battery does not charge, check the following:

  • Is the mobile router hot? If you are in a low-coverage area, are transferring a lot of data, or left the mobile router in a hot location, the internal temperature of the mobile router can rise above 45°C. In these conditions, the battery cannot be charged due to safety limits with lithium-ion battery technology.
  • Make sure that the USB cable and the AC wall charger are connected securely and are working correctly.
  • If the wall socket is controlled by a switch, make sure that the switch is in the power-on position.


Recharge the Battery from a Computer USB Port

To recharge the battery from the USB port on your computer:

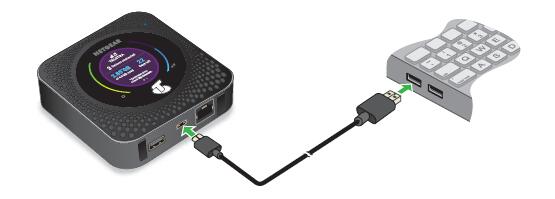
  1. Attach one end of the micro USB cable to the mobile router and plug the other end into the USB port on your computer.

The Battery icon includes a lightning bolt to indicate that the battery is charging.

The Battery icon on the LCD indicates when the battery is fully charged and a notification displays.

Note: The LCD goes into sleep mode after a set time to extend battery life. To wake up the LCD, press and quickly release the Power button.


Use the USB Type C Cable to Charge Only

You can log in to the mobile router and specify a setting so that the USB type C cable is used only for charging and not to access the mobile router using a web browser. You might want to do this if you are using the Ethernet port and a wall socket is not available to charge the mobile router.

To specify a USB type C cable charge-only setting:

  1. From a computer that is connected to your network, launch a web browser.
  2. Enter http://m.home or http://192.168.1.1. A login window opens.
  3. Enter the router user name and password. The user name is admin. The user name and password are case-sensitive. The mobile router dashboard displays.
  4. Select Setup > Router Setup. The Router Setup page displays.
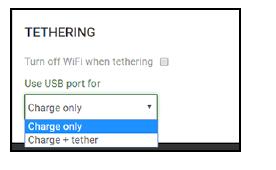
  5. In the TETHERING section, select Charge only.

Your settings are saved. When you connect the USB type C cable, the mobile router battery charges, but you cannot use the tethered connection to access the mobile router with a web browser.


Use the Mobile Router to Jump Boost another Device

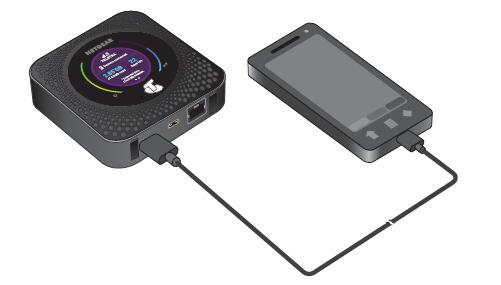
If your smartphone or other device is low on or out of battery power, you can give it a boost by connecting it to the mobile router’s USB port A connector.

Battery Tips

The following tips explain best practices for battery usage and care:

  • Charge batteries in a room-temperature environment, which is generally between 68°F and 79° F (20°C and 26°C). Charging might be temporarily disabled if the battery temperature exceeds 113°F (60°C). If the battery temperature is hot but less than 113°F (60°C), the battery can charge at a slower rate than usual.
  • If a battery exhibits significantly shorter runtime or discharge capacity compared to when it was new, it reached the end of its reasonable lifetime. Consider replacing it.
  • If a battery does not charge or exhibits excessive charging time, it is possible that it reached the end of its life and might need to be replaced.
  • All batteries degrade and lose charge capacity over time as a result of use or storage and must eventually be replaced.
  • Batteries are best stored in a cool, dark, dry place. Avoid storage in direct sunlight and in vehicles parked outdoors.
  • Batteries might get warm while charging and discharging. This is normal behavior for all batteries.
  • Use the AC adapter and the USB cable that came with this device.
  • Use the latest firmware. Check for updates on a regular basis.
  • Device performance and runtime are affected by workload or usage. Higher workloads or usage can lead to higher battery temperatures and faster battery power consumption.
  • Streaming large amounts of data affects the power consumption and reduces the operating time of the battery.

General Battery Safety

Observe the following guidelines:

  • Stop using a battery if its case appears damaged, swollen, or compromised. Examples include, but are not limited to, leaking, odors, dents, corrosion, rust, cracks, swelling, melting, and scratches.
  • Do not expose batteries to fire or other heat generating environments.
  • Do not place the battery or the device in areas that might get hot. Examples include, but are not limited to, on or near a space heater, cooking surface, cooking appliance, iron, radiator, or fireplace.
  • Do not get the battery or the device wet. Even though it might dry and appear to operate normally, the circuitry can slowly corrode and defeat its safety circuitry.
  • Do not crush, puncture, deform, or put a high degree of pressure on the battery, which can cause an internal short circuit, resulting in overheating.
  • Avoid dropping the battery or the device. Dropping it, especially on a hard surface, might cause damage to the battery and the device. If you suspect damage to the battery or the device, replace it.
  • When the battery is outside the device, do not allow the battery to come in contact with metal objects, such as coins, buttons, jewelry, or tools.
  • Do not disassemble or modify batteries. Do not use a battery for anything other than its intended purpose.


Appropriate Batteries and Chargers

Observe the following guidelines:

  • Use only approved batteries in the device. Purchase only products and accessories recommended by NETGEAR or your carrier. Use of unapproved batteries, products, or accessories will void your warranty.
  • Do not use incompatible batteries and chargers. Some websites and second-hand dealers, not associated with reputable manufacturers and carriers, might sell incompatible or even counterfeit batteries and chargers.
  • If you are unsure about whether a replacement battery or charger is compatible, contact NETGEAR.
  • Quick Charge 2.0–enabled devices must be paired with Quick Charge 2.0–certified adapters.


Battery Disposal

Follow disposal regulations in your region, and handle batteries safely. Observe the following guidelines:

  • Disposal regulations vary by region. Dispose of old batteries and equipment in compliance with your local regulations.
  • Proper disposal might include recycling programs for batteries, cell phones, or other electronic waste.
  • Do not dispose of batteries in a fire.

Netgear Nighthawk M1 Mobile Router Internet Access Control

The Netgear Nighthawk M1 router comes with a built-in firewall that helps protect your home network from unwanted intrusions from the Internet.

This chapter includes the following sections:

  • Set up Parental Controls
  • Access Control
  • Turn off USB Tethering
  • Manage Website Filters
  • Set up a Schedule for Internet Access
  • Enable SIM Security
  • Enable Port Forwarding
  • Set up Port Filtering
  • Enable DMZ


Set Up Parental Controls

The first time that you select Parental Controls, your browser goes to the Live Parental Controls website, where you can learn more about parental controls and download the application.

After you set up and enable parental controls, you can change the web filtering level for each device on the network through the network map page on the genie app.

To set up parental controls:

  1. From a computer that is connected to your network, launch a web browser.
  2. Enter http://m.home or http://192.168.1.1.

A login page displays.

  1. Enter the administrator login password.

The password is case-sensitive.

The dashboard displays.

  1. Select Settings > Security > Parental Controls.

The Parental Controls page displays.

  1. Select the Enable check box.

Because Live Parental Controls uses free OpenDNS accounts, you must log in or create a free account.

  1. Log in to your OpenDNS account:
  • If you already own an OpenDNS account, log in to your account.
  • If you do not own an OpenDNS account, click the Sign Up link to create a new account a log in.
  1. Select a filtering level.
  2. To create a list of unrestricted devices, do the following:

a.In the Unrestricted Devices section, click the ADD button.

  1. Select the device.

The device is added to the list.

  1. Click the Apply button.

Your settings are saved.


Access Control

You can use access control to set up a list of devices to be blocked from accessing the mobile router or to be allowed access.

Set Up Access Control From the NETGEAR Mobile App

To set up access control:

  1. On your smartphone, connect to the mobile router’s WiFi network.
  2. Launch the NETGEAR Mobile app.
  3. Swipe down.

The dashboard displays.

  1. Tap Devices.

The Devices page displays.

  1. Tap Block List or Allow List.

Depending on your selection, the page displays an Allow List or a Block List.

  1. To turn blocking on or off, tap the Block all in list slider.
  2. To turn an allow list on or off, tap the Allow only in list slider.
  3. To add a device to the list, tap + and select the device.

The device is added to the list.

  1. To remove a device from the list, select the device and then tap the trash can.

The device is removed from the list.

Set Up Access Control from a Web Browser

To set up access control:

  1. From a computer that is connected to your network, launch a web browser.
  2. Enter http://m.home or http://192.168.1.1.

A login page displays.

  1. Enter the administrator login password.

The password is case-sensitive.

The dashboard displays.

  1. Select Settings > Security > Access Control.

The Access Control page displays.

  1. Select the Enable check box.
  2. In the Filter Type menu, select Allow List or Block List.

Depending on your selection, the page displays an Allow List or a Block List.

  1. To add a device to the list, click the ADD button and select the device.

The device is added to the list.

  1. To remove a device from the list, select the device and then click the DELETE button.

The device is removed from the list.


Turn Off USB Tethering

USB tethering lets you connect to the Internet from supported computers with a USB cable and charge the mobile router battery at the same time.

Turn off USB tethering if you only want to charge your mobile router with your computer.

Turn Off USB Tethering From the NETGEAR Mobile App

To turn off tethering:

  1. On your smartphone, connect to the mobile router’s WiFi network.
  2. Launch the NETGEAR Mobile app.
  3. Swipe down.

The dashboard displays.

  1. Tap Settings.

The Settings page displays.

  1. Tap General.

The General page displays.

  1. Under ROUTER, tap Tethering to toggle between Charge only and Charge + tether.


Turn Off USB Tethering From a Web Browser

To turn off tethering:

  1. From a computer that is connected to your network, launch a web browser.
  2. Enter http://m.home or http://192.168.1.1.

A login page displays.

  1. Enter the administrator login password.

The password is case-sensitive.

The dashboard displays.

  1. Select Settings > Setup > Router Setup.

The Router Setup page displays.

  1. In the Use USB port for section, select Charge only.
  2. Click the Apply button.

Your settings are saved.


Manage Website Filters

You can set up a filter to block or allow access to websites that you specify. You can also set up a list of devices that are unrestricted. The website filtering does not apply to unrestricted devices.

To set up a website filter:

  1. From a computer that is connected to your network, launch a web browser.
  2. Enter http://m.home or http://192.168.1.1.

A login page displays.

  1. Enter the administrator login password.

The password is case-sensitive.

The dashboard displays.

  1. Select Settings > Security > Website Filters.

The Website Filters page displays.

  1. Select the Enable check box.
  2. In the Filter Type menu, select Block List or Allow List.

Depending on your selection, a Blocked Websites list or an Allowed Websites list displays.

  1. To add a website to the list, click the ADD button and enter the website.

The website is added to the list.

  1. To edit an entry in the list, do the following:
  2. Select its check box.
  3. Click the Edit icon.
  4. Enter the changes.
  5. To remove a website from the list, select its check box and then click the DELETE button.

The website is removed from the list.

  1. To create a list of unrestricted devices, do the following:
  2. In the Unrestricted Devices section, click the ADD button.
  3. Select the device.

The device is added to the list.

  1. Click the Apply button.

Your settings are saved.


Set Up a Schedule for Internet Access

To set up a schedule for Internet access:

  1. From a computer that is connected to your network, launch a web browser.
  2. Enter http://m.home or http://192.168.1.1.

A login page displays.

  1. Enter the administrator login password.

The password is case-sensitive.

The dashboard displays.

  1. Select Settings > Security > Schedule.

The Schedule page displays.

  1. Select the Enable check box.
  2. To add a schedule rule, click the Add button.

The NEW RULE page displays.

  1. Specify the name of the rule and the days and times for the rule.
  2. Click the SAVE button.

Your settings are saved.


Edit a Schedule Rule

To edit a schedule rule:

  1. From a computer that is connected to your network, launch a web browser.
  2. Enter http://m.home or http://192.168.1.1.

A login page displays.

  1. Enter the administrator login password.

The password is case-sensitive.

The dashboard displays.

  1. Select Settings > Security > Schedule.

The Schedule page displays.

  1. Click the Edit icon for the rule.

The EDIT RULE page displays.

  1. Change the settings.
  2. Click the SAVE button.

Your settings are saved.


Delete a Schedule Rule

To delete a schedule rule:

  1. From a computer that is connected to your network, launch a web browser.
  2. Enter http://m.home or http://192.168.1.1.

A login page displays.

  1. Enter the administrator login password.

The password is case-sensitive.

The dashboard displays.

  1. Select Settings > Security > Schedule.

The Schedule page displays.

  1. Select the check box for the rule.
  2. Click the DELETE button.

The rule is deleted.


Enable SIM Security

If you enable SIM security, you must enter a SIM PIN each time you power on the mobile router.

Enable SIM Security From the NETGEAR Mobile App

To enable SIM security:

  1. On your smartphone, connect to the mobile router’s WiFi network.
  2. Launch the NETGEAR Mobile app.
  3. Swipe down.

The dashboard displays.

  1. Tap Security.

The Security page displays.

  1. Tap SIM Security.

The SIM Security page displays.

  1. Tap ACTIVATE.

The Enter SIM Security page displays.

  1. Enter a PIN.
  2. Tap OKAY.

Your settings are saved.

If you enter an incorrect PIN three times, the SIM is blocked. If the SIM is blocked, contact your network service provider to receive a PUK number to unblock the SIM.


Enable SIM Security from a Web Browser

To enable SIM security:

  1. From a computer that is connected to your network, launch a web browser.
  2. Enter http://m.home or http://192.168.1.1.

A login page displays.

  1. Enter the administrator login password.

The password is case-sensitive.

The dashboard displays.

  1. Select Settings > Network > SIM Security.

The SIM Security page displays.

  1. Click the ACTIVATE button.
  2. Enter your PIN.
  3. Click the Apply button.

If you enter an incorrect PIN three times, the SIM is blocked. If the SIM is blocked, contact your network service provider to receive a PUK number to unblock the SIM.


Enable Netgear Nighthawk M1 Port Forwarding

Port forwarding is an advanced feature. If your computer is hosting a server, you can enable port forwarding so that other users can access the server.

Note: Port forwarding creates a security risk. When not required, disable port forwarding.

To enable port forwarding:

  1. From a computer that is connected to your network, launch a web browser.
  2. Enter http://m.home or http://192.168.1.1.

A login page displays.

  1. Enter the administrator login password.

The password is case-sensitive.

The dashboard displays.

  1. Select Settings > Router > Port Forwarding.

The Port Forwarding page displays.

  1. Select the Enable radio button.

The Port Forwarding list displays.

Incoming traffic is forwarded to specific ports and devices on your network using their local IP addresses.

  1. To add a port forwarding address, click the ADD button.

The ADD SERVICE page displays.

  1. Enter the following port forwarding information:
  • Rule Name. Enter a descriptive name.
  • IP Address. Enter the IP address of the connected device.
  • Port. Enter the port number that the application uses.
  • Protocol. If you are unsure, select TCP.
  1. Click the ADD button.

Your settings are saved.


Set Up Port Filtering

You can select which applications (for example, HTTP, FTP, email servers) can access the Internet. Used with other security measures such as a firewall, port filtering can enhance network security.

To set up port filtering:

  1. From a computer that is connected to your network, launch a web browser.
  2. Enter http://m.home or http://192.168.1.1.

A login page displays.

  1. Enter the administrator login password.

The password is case-sensitive.

The dashboard displays.

  1. Select Settings > Router > Port Filtering.

The Port Filtering page displays.

  1. Select the Enable check box.

The Filter Type menu displays.

  1. Select Block List or Allow List.

The ADD SERVICE page displays.

  1. Enter the following port forwarding information:
  • Service Name. Enter a descriptive name.
  • Port. Enter the port number that the application uses.
  • Protocol. If you are unsure, select TCP.
  1. Click the ADD button.

Your settings are saved.


Enable DMZ

In a demilitarized zone (DMZ) network configuration, a computer runs outside the firewall in the DMZ. This computer intercepts incoming Internet traffic, providing an extra layer of protection for the rest of the network, and sending all incoming data to a particular IP address.

To enable the DMZ and designate a computer to screen incoming traffic:

  1. From a computer that is connected to your network, launch a web browser.
  2. Enter http://m.home or http://192.168.1.1.

A login page displays.

  1. Enter the administrator login password.

The password is case-sensitive.

The dashboard displays.

  1. Select Settings > Advanced > Other.

The Other page displays.

  1. Select the Enable check box.
  2. In the DMZ Address field, enter the IP address of the computer to which you want all data sent.

If the mobile router is tethered using a USB cable, this address is 192.168.1.4. If the mobile router is connected using WiFi, the first WiFi client’s IP address is usually 192.168.1.74.

  1. Click the Apply button.

Your settings are saved.

Netgear M1 Share Media and Storage

You can use the Netgear M1 mobile router to share media and storage devices. The mobile router supports MyMedia on mobile devices. You can insert a USB storage device in the mobile router USB type A port and you can install a micro SD card in the mobile router.

The chapter includes the following sections:

  • Manage Shared Storage Devices
  • Install a Micro SD Card
  • View Storage Device Usage and Capacity
  • Upload Media Files to Mobile Router Storage
  • Play Media


Manage Shared Storage Devices

You can insert a USB storage device in the mobile router USB type A port and you can install a micro SD card in the mobile router. You can access the files and folders on these devices from computers and mobile devices that are connected to the mobile router network.

USB Device Requirements

The router works with most USB-compliant external flash and hard drives. Some USB external hard drives and flash drives require you to load the drivers onto the computer before the computer can access the USB device. Such USB devices do not work with the LTE router.

The router supports the following file system types for full read/write access:

  • FAT16
  • FAT32

When you purchase a USB storage device, the package typically identifies its format. For information about how to format a USB storage device using a Windows or Mac computer, consult the help instructions for your computer or operating system.


Connect a USB Storage Device

You can access and share a USB storage device connected to the mobile router USB type A port. (If your storage device uses special drivers, it is not compatible.) You can continue use the micro USB port to charge the mobile router or for a tethered connection.

To connect a USB storage device:

  1. Insert your USB storage drive into a USB port on the router.
  2. If your USB device uses a power supply, connect it.

You must use the power supply when you connect the USB device to the router.

When you connect the USB device to the router USB port, it might take up to two minutes before it is ready for sharing.


Micro SD Card Requirements

The mobile router supports SD cards up to 128 GB in the following formats:

  • FAT
  • FAT-16
  • FAT-32

———————————————————–Note: For information about how to format a USB storage device using a computer or other device, consult the instructions that came with your computer or device.

———————————————————–

Formatting the USB storage device erases all data on the device.


Install a Micro SD Card

Micro SD cards are sold separately.

To install the micro SD card:

  1. Obtain a micro SD card (sold separately).
  2. Make sure that power to the mobile router is off.
  3. Remove the cover on the bottom of the mobile router.

Place your thumbs on the arrows on the cover and press down while sliding the cover up.

  1. Insert the micro SD card into the micro SD slot.

Replace the mobile router cover.


View Storage Device Usage and Capacity

You can view the storage capacity for a USB storage device attached to the mobile router and a micro SD card installed in the mobile router.

To view storage device capacity and usage:

  1. On your smartphone, connect to the mobile router’s WiFi network.
  2. Launch the NETGEAR Mobile app.
  3. Swipe down.

The dashboard displays.

  1. Tap Storage.

The Storage page displays the used and available storage for each connected device.


Upload Media Files to Netgear Nighthawk Mobile Router Storage

You can upload media files to either a micro SD card or a USB storage device connected to the mobile router. Micro SD cards and USB drives are sold separately.

To upload media files onto a storage device:

  1. Insert the storage device into the mobile router.

You can install a micro SD card and you can attach a USB storage device to the USB port. If your USB device uses a power supply, connect it. You must use the power supply when you connect the USB device to the router.

  1. From a computer that is connected to your network, launch a web browser.
  2. Enter http://m.home or http://192.168.1.1.

A login page displays.

  1. Enter the administrator login password.

The password is case-sensitive.

The dashboard displays.

  1. Click the MyMedia tab.
  2. Drag and drop your files on to the page.


Play Media

The NETGEAR Mobile app includes a MyMedia shortcut that displays categories of supported media types to play back. You can connect any DLNA-compatible client to the mobile router. This includes computers running Windows Media Player and other DLNA–enabled devices such as smart TVs.

To play media using the NETGEAR Mobile app:

  1. On your smartphone, connect to the mobile router’s WiFi network.
  2. Launch the NETGEAR Mobile app.
  3. Swipe down.

The dashboard displays.

  1. Tap Storage.

The Storage page displays the used and available storage for each connected device.

  1. Tap MyMedia.

The MyMedia shortcut displays categories of supported media types to play back.

  1. Select the media to play.

A list of devices on the network displays. You are prompted to select a device on which to play your media.

  1. Select the device on which to play the media.

The media plays on the selected device.

How to Update Netgear Nighthawk M1 Firmware

There are three methods to update the Nighthawk M1 firmware as below:

Update Netgear Nighthawk M1 Mobile Router Firmware

The Netgear Nighthawk M1 mobile router automatically checks for new firmware updates. If an update becomes available, the mobile router displays an alert. You can also check for updates manually without receiving an alert.

Update Firmware from an Alert

To update the firmware:

  1. Open the alert.
  2. Click the Download button.

When the download completes, the mobile router displays an alert with an Install now button.

  1. Click the Install now button.

The update installs. The mobile router reboots automatically and uses the new software.


Update Firmware from the NETGEAR Mobile App

To update firmware using the NETGEAR Mobile app:

  1. On your smartphone, connect to the mobile router’s WiFi network.
  2. Launch the NETGEAR Mobile app.
  3. Swipe down.

The dashboard displays.

  1. Tap Settings > Firmware.

The Firmware page displays.

  1. Tap CHECK FOR UPDATE.

The mobile router checks for firmware updates. If an updated is available, it is automatically downloaded.

  1. Tap INSTALL UPDATE.

After the update install completes, a success message displays.


Update the Firmware from the Web Page

To update firmware using the mobile router web page:

  1. From a computer that is connected to your network, launch a web browser.
  2. Enter http://m.home or http://192.168.1.1.

A login page displays.

  1. Enter the administrator login password.

The password is case-sensitive.

The dashboard displays. If a firmware update is available, a blue INSTALL NEW FIRMWARE link displays on the right.

  1. Click the INSTALL NEW FIRMWARE link.

The update downloads.

  1. Follow the onscreen instructions to install the update.

After the update completes, the mobile router reboots.


Check more user manual about Netgear Nighthawk M1 MR1100 Settings here:

https://www.4gltemall.com/netgear-nighthawk-m1-mr1100.html

How to Manage Nighthawk M1 Telstra Mobile Router Network

This chapter describes the Telstra Nighthawk M1 router settings for administering and maintaining your router and home network.

The chapter includes the following sections:

  • View the Network Status
  • View Mobile Router Device Status
  • View WiFi Details
  • View a Network Map
  • View Connected Devices
  • Update the Mobile Router Firmware
  • Change the admin Password
  • Manage SMS Messages
  • LED Settings
  • Back Up and Restore the Mobile Router Settings
  • Factory Reset
  • Reboot the Mobile Router
  • Power Off the Mobile Router
  • View Details About Your Mobile Router


View the Network Status

To view the network status:

  1. From a computer that is connected to your network, launch a web browser.
  2. Enter http://m.home or http://192.168.1.1.

A login page displays.

  1. Enter the administrator login password.

The password is case-sensitive.

The dashboard displays.

  1. Select SETTINGS> Mobile Router Status > ACCOUNT.

The Network Status page displays.


View Mobile Router Device Status

You can view details about the status of your modem router.

View Mobile Router Device Status From the NETGEAR Mobile App

To view device status:

  1. On your smartphone, connect to the mobile router’s WiFi network.
  2. Launch the NETGEAR Mobile app.
  3. Swipe down.

The dashboard displays.

  1. Tap Settings.

The Settings page displays.

  1. Tab About.

The About page displays.


View Mobile Router Device Status From a Web Browser

To view device status:

  1. From a computer that is connected to your network, launch a web browser.
  2. Enter http://m.home or http://192.168.1.1.

A login page displays.

  1. Enter the administrator login password.

The password is case-sensitive.

The dashboard displays.

  1. Select SETTINGS > Mobile Router Status > DEVICE.

The Device Status page displays.


View WiFi Details

To view WiFi status:

  1. From a computer that is connected to your network, launch a web browser.
  2. Enter http://m.home or http://192.168.1.1.

A login page displays.

  1. Enter the administrator login password.

The password is case-sensitive.

The dashboard displays.

  1. Select SETTINGS > Mobile Router Status > WIFI DETAILS.

The WIFI DETAILS page displays.


View a Network Map

The network map shows the status of your mobile router network and your Internet connection.

View a Network Map from the NETGEAR Mobile App

To view a network map:

  1. On your smartphone, connect to the mobile router’s WiFi network.
  2. Launch the NETGEAR Mobile app.
  3. Swipe down.

The dashboard displays.

  1. Tap Network Map.

The network map displays.


View a Network Map from a Web Browser

To view a network map:

  1. From a computer that is connected to your network, launch a web browser.
  2. Enter http://m.home or http://192.168.1.1.

A login page displays.

  1. Enter the administrator login password.

The password is case-sensitive.

The dashboard displays a network map.


View Connected Devices

You can view a list of devices that are connected to your mobile router.

View the Connected Devices on the LCD

To view the connected devices from the LCD:

To wake the device, press the Power button.
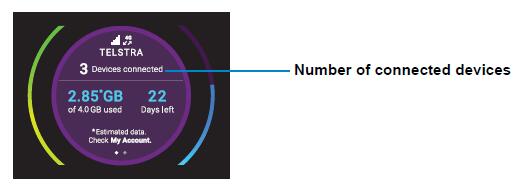
The screen shows the number of connected devices.


View the Connected Devices from the NETGEAR Mobile App

To view the connected devices from the NETGEAR Mobile app:

  1. On your smartphone, connect to the mobile router’s WiFi network.
  2. Launch the NETGEAR Mobile app.
  3. Swipe down.

The dashboard displays.

  1. Tap Connected Devices.

A list of connected devices displays.


View the Connected Devices from a Web Browser

To view the connected devices from the mobile router web page:

  1. From a computer that is connected to your network, launch a web browser.
  2. Enter http://m.home or http://192.168.1.1.

A login page displays.

  1. Enter the administrator login password.

The password is case-sensitive.

A list of devices connected to the main WiFi and guest WiFi networks displays on the dashboard.

If you notice a WiFi device that you do not recognize, you can block that device from connecting to your WiFi network.


Update Netgear Nighthawk M1 Mobile Router Firmware

The mobile router automatically checks for new firmware updates. If an update becomes available, the mobile router displays an alert. You can also check for updates manually without receiving an alert.

Update Firmware From an Alert

To update the firmware:

  1. Open the alert.
  2. Click the Download button.

When the download completes, the mobile router displays an alert with an Install now button.

  1. Click the Install now button.

The update installs. The mobile router reboots automatically and uses the new software.


Update Firmware from the NETGEAR Mobile App

To update firmware using the NETGEAR Mobile app:

  1. On your smartphone, connect to the mobile router’s WiFi network.
  2. Launch the NETGEAR Mobile app.
  3. Swipe down.

The dashboard displays.

  1. Tap Settings > Firmware.

The Firmware page displays.

  1. Tap CHECK FOR UPDATE.

The mobile router checks for firmware updates. If an updated is available, it is automatically downloaded.

  1. Tap INSTALL UPDATE.

After the update install completes, a success message displays.


Update the Firmware from the Web Page

To update firmware using the mobile router web page:

  1. From a computer that is connected to your network, launch a web browser.
  2. Enter http://m.home or http://192.168.1.1.

A login page displays.

  1. Enter the administrator login password.

The password is case-sensitive.

The dashboard displays. If a firmware update is available, a blue INSTALL NEW FIRMWARE link displays on the right.

  1. Click the INSTALL NEW FIRMWARE link.

The update downloads.

  1. Follow the onscreen instructions to install the update.

After the update completes, the mobile router reboots.


Change the admin Password

To change admin password:

The admin password is used to log in to the mobile router with the user name admin. This password is not the one that you use for WiFi access.

When you used the NETGEAR Mobile app to set up the mobile router, you changed the admin password. To change it again, you must use web browser access from a computer. The ideal password contains no dictionary words from any language and contains uppercase and lowercase letters, numbers, and symbols.

  1. From a computer that is connected to your network, launch a web browser.
  2. Enter http://m.home or http://192.168.1.1.

A login page displays.

  1. Enter the administrator login password.

The password is case-sensitive.

The dashboard displays.

  1. Select Settings > Administration > Set Password.

The Set Password page displays.

  1. Enter your current password in the Old Password field.
  2. Enter your new password in the New Password field and the Repeat Password field.

Your settings are saved.


Manage SMS Messages

You can view messages from the NETGEAR Mobile app or the mobile router web page.

Manage Messages from the NETGEAR Mobile App

To manage SMS messages from the NETGEAR Mobile app:

  1. On your smartphone, connect to the mobile router’s WiFi network.
  2. Launch the NETGEAR Mobile app.
  3. Swipe down.

The dashboard displays.

  1. Tap Messages.

The Messages page displays.

  1. To read the full text of a message, tap the message.
  2. To delete a message, tap and hold the message to select it, and then tap the Delete button.

The message is deleted.


View or Delete Messages from a Web Browser

To view or delete SMS messages from the mobile router web page:

  1. From a computer that is connected to your network, launch a web browser.
  2. Enter http://m.home or http://192.168.1.1.

A login page displays.

  1. Enter the administrator login password.

The password is case-sensitive.

The dashboard displays a list of messages, showing the first portion of the text.

  1. Click a message to read the full text.
  2. To delete a message, click the message and then click the Delete button.

The message is deleted.


LED Settings

You can turn the LED blinking off and on.

To turn the LED blinking on or off:

  1. From a computer that is connected to your network, launch a web browser.
  2. Enter http://m.home or http://192.168.1.1.

A login page displays.

  1. Enter the administrator login password.

The password is case-sensitive.

The dashboard displays.

  1. In the upper right corner, click the menu icon.

The menu opens.

  1. Select LED Settings.

The LED Settings page displays.

  1. Select the Enable LED blinking or Disable LED blinking radio button.
  2. Click the Apply button.

Your settings are saved.


Back Up and Restore the Mobile Router Settings

You can back up and restore mobile router settings. Backing up and restoring is useful if you use more than one device and you want the same settings on all of your devices. You can also save your settings before resetting to factory defaults or changing the settings.

Back Up the Mobile Router Settings

To back up mobile router settings:

  1. From a computer that is connected to your network, launch a web browser.
  2. Enter http://m.home or http://192.168.1.1.

A login page displays.

  1. Enter the administrator login password.

The password is case-sensitive.

The dashboard displays.

  1. Select Settings > Administration > Backup.
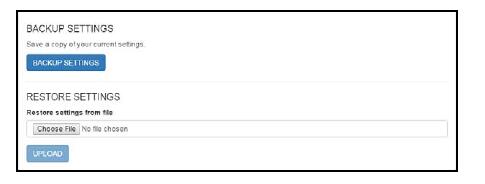
  2. Click the BACKUP Settings button.

By default, the file (export.cfg) is saved to your Downloads folder.


Restore the Mobile Router Settings

To restore mobile router settings:

  1. From a computer that is connected to your network, launch a web browser.
  2. Enter http://m.home or http://192.168.1.1.

A login page displays.

  1. Enter the administrator login password.

The password is case-sensitive.

The dashboard displays.

  1. Select Settings > Administration > Backup.
  2. Select the export.cfg file to restore using one of the following methods:
  • To browse and select a local file, click the Choose File button.
  • To select a backup file from the network, click the UPLOAD button.

By default, mobile router setting files are saved to your Downloads folder.

  1. Click the Open button.

Your mobile router is restored with the imported file settings.


Factory Reset

You can return the mobile router to its factory settings.

Factory Reset From the NETGEAR Mobile App

To reset the mobile router and return it to its factory settings:

  1. On your smartphone, connect to the mobile router’s WiFi network.
  2. Launch the NETGEAR Mobile app.
  3. Swipe down.

The dashboard displays.

  1. Tap Settings > Firmware.

The Firmware page displays.

  1. Tap PERFORM FACTORY RESET.
  2. Tap YES.

The mobile router resets and returns to its factory settings.


Factory Reset from a Web Browser

To perform a factory reset:

  1. From a computer that is connected to your network, launch a web browser.
  2. Enter http://m.home or http://192.168.1.1.

A login page displays.

  1. Enter the administrator login password.

The password is case-sensitive.

The dashboard displays.

  1. Select Settings > Administration > Factory Reset.

The Factory Reset page displays.

  1. Click the Factory Reset button.
  2. When prompted, click the Yes button to confirm.

The mobile router resets and returns to its factory settings.


Factory Reset Using the Reset Button

You must remove the cover on the bottom of the mobile router to access the Reset button.

To perform a factory reset using the Reset button:

  1. Make sure that the mobile router LED is lit to indicate that it is receiving power from the battery.
  2. Remove the cover on the bottom of the mobile router.
  3. Place your thumbs on the arrows on the cover and press down while sliding the cover up.
  4. Leave the battery in place.
  5. Locate the Reset button.
  6. With a sharp object such as a paperclip, press and hold the Reset button for five seconds. The mobile router returns to factory settings.
  7. 7. Replace the cover on the back of the mobile router.


Reboot the Mobile Router

You can reboot the mobile router from the NETGEAR mobile app or from a web browser.

Reboot the Mobile Router From the NETGEAR Mobile App

  1. On your smartphone, connect to the mobile router’s WiFi network.
  2. Launch the NETGEAR Mobile app.
  3. Swipe down.

The dashboard displays.

  1. Tap Power.

The Power Options page displays.

  1. Tap REBOOT DEVICE.

The mobile router reboots.


Reboot the Mobile Router From a Web Browser

To reboot the mobile router:

  1. From a computer that is connected to your network, launch a web browser.
  2. Enter http://m.home or http://192.168.1.1.

A login page displays.

  1. Enter the administrator login password.

The password is case-sensitive.

The dashboard displays.

  1. In the upper, right corner, click the menu icon.
  2. The menu opens.
  3. Select Reboot.
  4. When prompted, click the REBOOT button. The mobile router reboots.


Power Off the Mobile Router

You can use the Power button on the mobile router to turn it off, or you can log in to the mobile router with a browser and shut down the mobile router.

Power Off the Mobile Router Manually

Press and hold the Power button on the device for a few seconds.


Power Off the Mobile Router From the NETGEAR Mobile App

  1. On your smartphone, connect to the mobile router’s WiFi network.
  2. Launch the NETGEAR Mobile app.
  3. Swipe down. The dashboard displays.
  4. Tap Power. The Power Options page displays.
  5. Tap POWER OFF DEVICE. The mobile router turns off.


Power Off the Mobile Router From a Web Browser

  1. From a computer that is connected to your network, launch a web browser.
  2. Enter http://m.home or http://192.168.1.1.

A login page displays.

  1. Enter the administrator login password.

The password is case-sensitive.

The dashboard displays.

  1. In the upper right corner of the page, click the menu icon.

The menu opens.

  1. Select Power Off.
  2. When prompted, click the SHUTDOWN button.

The mobile router powers off.


View Details About Your Mobile Router

You can view details about your device such as the model number, software version, and IMEI (International Mobile Equipment Identity).

View Mobile Router Details From the NETGEAR Mobile App

  1. On your smartphone, connect to the mobile router’s WiFi network.
  2. Launch the NETGEAR Mobile app.
  3. Swipe down.

The dashboard displays.

  1. Tap Settings > About.

The About page displays.


View Mobile Router Details from a Web Browser

  1. From a computer that is connected to your network, launch a web browser.
  2. Enter http://m.home or http://192.168.1.1.

A login page displays.

  1. Enter the administrator login password.

The password is case-sensitive.

The dashboard displays.

  1. Select Settings > About. The ‘About’ page displays.
 

Netgear Nighthawk M1 Troubleshooting

This chapter provides suggestions for troubleshooting problems that might arise when you are using your Netgear Nighthawk M1 mobile router. The chapter covers the following topics:

  • Diagnostics
  • The WiFi Network Name Is Not in the List of Networks
  • The No Signal Icon Displays
  • Cannot Log In to the Mobile Router Using a VPN
  • The Mobile Router Cannot Connect to a Computer Running Windows Vista
  • The Mobile Router Does Not Connect to the Cellular Network


Diagnostics of Netgear Nighthawk M1

To view diagnostics:

  1. From a computer that is connected to your network, launch a web browser.
  2. Enter http://m.home or http://192.168.1.1.

A login page displays.

  1. Enter the administrator login password.

The password is case-sensitive.

The dashboard displays.

  1. Select Settings > Mobile Router Status > DIAGNOSTICS.

The Diagnostics page displays.


The WiFi Network Name Is Not in the List of Networks

If you do not see the Netgear Nighthawk M1 mobile router’s WiFi networks from your computer or mobile device, try these suggestions:

  • Refresh the list of networks.
  • If the LCD is dark, the WiFi radio might be asleep. Press the Power button to wake the M1 mobile router.
  • If the mobile router is tethered to your computer, make sure that WiFi is set to stay on when the mobile router is tethered. See Use the USB Type C Cable to Charge Only in How to Use Netgear Nighthawk M1 Router.


The No Signal Icon Displays

If the No Signal icon displays on either the LCD or the mobile router web page, make sure that you are in your network service provider’s coverage area.

Cannot Log In to the Mobile Router Using a VPN

If you are using your mobile router while connected to a VPN, you might not be able to access the mobile router web page using http://m.home.

To directly access the mobile router web page hosted on the device, enter the address http://192.168.1.1 in your browser.


The Mobile Router Cannot Connect to a Computer Running Windows Vista

A known issue exists whereby computers running Microsoft Windows Vista cannot obtain an IP address from certain 4G routers. More information and a fix are available at support.microsoft.com/kb/928233, or visit the Microsoft support website and search for knowledge base article 928233.


The Mobile Router Does Not Connect to the Cellular Network

If your Nighthawk M1 mobile router does not connect to your service provider’s mobile broadband network, try the following suggestions:

  • Make sure that your SIM account is active. To check SIM status, contact your Internet service provider.
  • If you use a prepaid SIM card, make sure that the account balance is positive.
  • If your mobile router still does not connect, you might need to create or update the default connection profile.
  1. From a computer that is connected to your network, launch a web browser.
  2. Enter http://m.home or http://192.168.1.1. A login page displays.
  3. Enter the mobile router password. The password is case-sensitive. The dashboard displays.
  4. Select Settings > Advanced Settings > Cellular. The Cellular page displays.
  5. In the APN section, review the ISP settings.
  6. To change the active APN or to change the APN settings, click the Edit icon.

For more information about changing these settings, see Specify Cellular Settings .