The Netgear Nighthawk M1 router comes with a built-in firewall that helps protect your home network from unwanted intrusions from the Internet.
This chapter includes the following sections:
- Set up Parental Controls
- Access Control
- Turn off USB Tethering
- Manage Website Filters
- Set up a Schedule for Internet Access
- Enable SIM Security
- Enable Port Forwarding
- Set up Port Filtering
- Enable DMZ
Set Up Parental Controls
The first time that you select Parental Controls, your browser goes to the Live Parental Controls website, where you can learn more about parental controls and download the application.
After you set up and enable parental controls, you can change the web filtering level for each device on the network through the network map page on the genie app.
To set up parental controls:
- From a computer that is connected to your network, launch a web browser.
- Enter http://m.home or http://192.168.1.1.
A login page displays.
- Enter the administrator login password.
The password is case-sensitive.
The dashboard displays.
- Select Settings > Security > Parental Controls.
The Parental Controls page displays.
- Select the Enable check box.
Because Live Parental Controls uses free OpenDNS accounts, you must log in or create a free account.
- Log in to your OpenDNS account:
- If you already own an OpenDNS account, log in to your account.
- If you do not own an OpenDNS account, click the Sign Up link to create a new account a log in.
- Select a filtering level.
- To create a list of unrestricted devices, do the following:
a.In the Unrestricted Devices section, click the ADD button.
- Select the device.
The device is added to the list.
- Click the Apply button.
Your settings are saved.
Access Control
You can use access control to set up a list of devices to be blocked from accessing the mobile router or to be allowed access.
Set Up Access Control From the NETGEAR Mobile App
To set up access control:
- On your smartphone, connect to the mobile router’s WiFi network.
- Launch the NETGEAR Mobile app.
- Swipe down.
The dashboard displays.
- Tap Devices.
The Devices page displays.
- Tap Block List or Allow List.
Depending on your selection, the page displays an Allow List or a Block List.
- To turn blocking on or off, tap the Block all in list slider.
- To turn an allow list on or off, tap the Allow only in list slider.
- To add a device to the list, tap + and select the device.
The device is added to the list.
- To remove a device from the list, select the device and then tap the trash can.
The device is removed from the list.
Set Up Access Control from a Web Browser
To set up access control:
- From a computer that is connected to your network, launch a web browser.
- Enter http://m.home or http://192.168.1.1.
A login page displays.
- Enter the administrator login password.
The password is case-sensitive.
The dashboard displays.
- Select Settings > Security > Access Control.
The Access Control page displays.
- Select the Enable check box.
- In the Filter Type menu, select Allow List or Block List.
Depending on your selection, the page displays an Allow List or a Block List.
- To add a device to the list, click the ADD button and select the device.
The device is added to the list.
- To remove a device from the list, select the device and then click the DELETE button.
The device is removed from the list.
Turn Off USB Tethering
USB tethering lets you connect to the Internet from supported computers with a USB cable and charge the mobile router battery at the same time.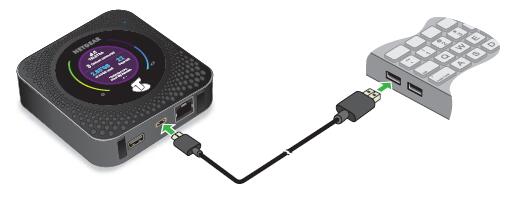
Turn off USB tethering if you only want to charge your mobile router with your computer.
Turn Off USB Tethering From the NETGEAR Mobile App
To turn off tethering:
- On your smartphone, connect to the mobile router’s WiFi network.
- Launch the NETGEAR Mobile app.
- Swipe down.
The dashboard displays.
- Tap Settings.
The Settings page displays.
- Tap General.
The General page displays.
- Under ROUTER, tap Tethering to toggle between Charge only and Charge + tether.
Turn Off USB Tethering From a Web Browser
To turn off tethering:
- From a computer that is connected to your network, launch a web browser.
- Enter http://m.home or http://192.168.1.1.
A login page displays.
- Enter the administrator login password.
The password is case-sensitive.
The dashboard displays.
- Select Settings > Setup > Router Setup.
The Router Setup page displays.
- In the Use USB port for section, select Charge only.
- Click the Apply button.
Your settings are saved.
Manage Website Filters
You can set up a filter to block or allow access to websites that you specify. You can also set up a list of devices that are unrestricted. The website filtering does not apply to unrestricted devices.
To set up a website filter:
- From a computer that is connected to your network, launch a web browser.
- Enter http://m.home or http://192.168.1.1.
A login page displays.
- Enter the administrator login password.
The password is case-sensitive.
The dashboard displays.
- Select Settings > Security > Website Filters.
The Website Filters page displays.
- Select the Enable check box.
- In the Filter Type menu, select Block List or Allow List.
Depending on your selection, a Blocked Websites list or an Allowed Websites list displays.
- To add a website to the list, click the ADD button and enter the website.
The website is added to the list.
- To edit an entry in the list, do the following:
- Select its check box.
- Click the Edit icon.
- Enter the changes.
- To remove a website from the list, select its check box and then click the DELETE button.
The website is removed from the list.
- To create a list of unrestricted devices, do the following:
- In the Unrestricted Devices section, click the ADD button.
- Select the device.
The device is added to the list.
- Click the Apply button.
Your settings are saved.
Set Up a Schedule for Internet Access
To set up a schedule for Internet access:
- From a computer that is connected to your network, launch a web browser.
- Enter http://m.home or http://192.168.1.1.
A login page displays.
- Enter the administrator login password.
The password is case-sensitive.
The dashboard displays.
- Select Settings > Security > Schedule.
The Schedule page displays.
- Select the Enable check box.
- To add a schedule rule, click the Add button.
The NEW RULE page displays.
- Specify the name of the rule and the days and times for the rule.
- Click the SAVE button.
Your settings are saved.
Edit a Schedule Rule
To edit a schedule rule:
- From a computer that is connected to your network, launch a web browser.
- Enter http://m.home or http://192.168.1.1.
A login page displays.
- Enter the administrator login password.
The password is case-sensitive.
The dashboard displays.
- Select Settings > Security > Schedule.
The Schedule page displays.
- Click the Edit icon for the rule.
The EDIT RULE page displays.
- Change the settings.
- Click the SAVE button.
Your settings are saved.
Delete a Schedule Rule
To delete a schedule rule:
- From a computer that is connected to your network, launch a web browser.
- Enter http://m.home or http://192.168.1.1.
A login page displays.
- Enter the administrator login password.
The password is case-sensitive.
The dashboard displays.
- Select Settings > Security > Schedule.
The Schedule page displays.
- Select the check box for the rule.
- Click the DELETE button.
The rule is deleted.
Enable SIM Security
If you enable SIM security, you must enter a SIM PIN each time you power on the mobile router.
Enable SIM Security From the NETGEAR Mobile App
To enable SIM security:
- On your smartphone, connect to the mobile router’s WiFi network.
- Launch the NETGEAR Mobile app.
- Swipe down.
The dashboard displays.
- Tap Security.
The Security page displays.
- Tap SIM Security.
The SIM Security page displays.
- Tap ACTIVATE.
The Enter SIM Security page displays.
- Enter a PIN.
- Tap OKAY.
Your settings are saved.
If you enter an incorrect PIN three times, the SIM is blocked. If the SIM is blocked, contact your network service provider to receive a PUK number to unblock the SIM.
Enable SIM Security from a Web Browser
To enable SIM security:
- From a computer that is connected to your network, launch a web browser.
- Enter http://m.home or http://192.168.1.1.
A login page displays.
- Enter the administrator login password.
The password is case-sensitive.
The dashboard displays.
- Select Settings > Network > SIM Security.
The SIM Security page displays.
- Click the ACTIVATE button.
- Enter your PIN.
- Click the Apply button.
If you enter an incorrect PIN three times, the SIM is blocked. If the SIM is blocked, contact your network service provider to receive a PUK number to unblock the SIM.
Enable Netgear Nighthawk M1 Port Forwarding
Port forwarding is an advanced feature. If your computer is hosting a server, you can enable port forwarding so that other users can access the server.
Note: Port forwarding creates a security risk. When not required, disable port forwarding.
To enable port forwarding:
- From a computer that is connected to your network, launch a web browser.
- Enter http://m.home or http://192.168.1.1.
A login page displays.
- Enter the administrator login password.
The password is case-sensitive.
The dashboard displays.
- Select Settings > Router > Port Forwarding.
The Port Forwarding page displays.
- Select the Enable radio button.
The Port Forwarding list displays.
Incoming traffic is forwarded to specific ports and devices on your network using their local IP addresses.
- To add a port forwarding address, click the ADD button.
The ADD SERVICE page displays.
- Enter the following port forwarding information:
- Rule Name. Enter a descriptive name.
- IP Address. Enter the IP address of the connected device.
- Port. Enter the port number that the application uses.
- Protocol. If you are unsure, select TCP.
- Click the ADD button.
Your settings are saved.
Set Up Port Filtering
You can select which applications (for example, HTTP, FTP, email servers) can access the Internet. Used with other security measures such as a firewall, port filtering can enhance network security.
To set up port filtering:
- From a computer that is connected to your network, launch a web browser.
- Enter http://m.home or http://192.168.1.1.
A login page displays.
- Enter the administrator login password.
The password is case-sensitive.
The dashboard displays.
- Select Settings > Router > Port Filtering.
The Port Filtering page displays.
- Select the Enable check box.
The Filter Type menu displays.
- Select Block List or Allow List.
The ADD SERVICE page displays.
- Enter the following port forwarding information:
- Service Name. Enter a descriptive name.
- Port. Enter the port number that the application uses.
- Protocol. If you are unsure, select TCP.
- Click the ADD button.
Your settings are saved.
Enable DMZ
In a demilitarized zone (DMZ) network configuration, a computer runs outside the firewall in the DMZ. This computer intercepts incoming Internet traffic, providing an extra layer of protection for the rest of the network, and sending all incoming data to a particular IP address.
To enable the DMZ and designate a computer to screen incoming traffic:
- From a computer that is connected to your network, launch a web browser.
- Enter http://m.home or http://192.168.1.1.
A login page displays.
- Enter the administrator login password.
The password is case-sensitive.
The dashboard displays.
- Select Settings > Advanced > Other.
The Other page displays.
- Select the Enable check box.
- In the DMZ Address field, enter the IP address of the computer to which you want all data sent.
If the mobile router is tethered using a USB cable, this address is 192.168.1.4. If the mobile router is connected using WiFi, the first WiFi client’s IP address is usually 192.168.1.74.
- Click the Apply button.
Your settings are saved.