How to change the network type on Vodafone Gigacube Cat19?

Depending on the location, different network types are available. The network mode affects the data speed of the router.

So you can choose the network mode on the Vodafone GigaCube CAT19

  1. Click on the network via the GigaCube web interface.
  2. Dial under Mobile networkSearch mobile network.
  3. Under Preferred Network Mode, select the desired network mode Auto / 2G Only / 3G Only / 4G Only.
  4. Press on Save.


Click to check more about Vodafone GigaCube Cat19 FAQs and User Manual

How to connect with Vodafone Gigacube Cat19 by WPS?

  1. Press and hold the Hi-key / WPS button on the Vodafone GigaCube CAT19 for at least 2 seconds until the Wi-Fi LED indicator flashes.
  2. Activate WPS on your device within 2 minutes to connect to the Wi-Fi network of the GigaCube.

Click to check more about Vodafone GigaCube Cat19 FAQs and User Manual

How to set up your Vodafone GigaCube CAT19?

Before you start, check the contents of the delivered GigaCube. The package includes the Vodafone GigaCube CAT19, the power supply, LAN cable and installation instructions.

First, put Vodafone GigaCube CAT19 into operation

  1. Your micro SIM card is inserted.
  2. Plug in the network cable or connect your device to the WLAN.

Good to know: If you use WLAN, enter the WLAN password (network security key).
You can find it on the sticker at the bottom of the GigaCube. You will also find a sticker in the packaging.
Note: The GigaCube must be connected to the mobile Internet.
It’s even easier now with a QR code scanner. Scan the QR code and connect directly to the GigaCube via Wi-Fi.
Tip: Use the Huawei SmartHome app. The QR code scanner is already there.
Read more under How to manage your GigaCube CAT19 via the Huawei SmartHome app.

  1. Enter http: //giga.cubeor 168.8.1 in the address field of the internet browser.
  2. Enterthe GigaCube password (router login password). You can find it on the sticker at the bottom of the GigaCube.
  3. Click on Login.
  4. You will get an info about the automatic update.
  5. We recommend activating the auto-update. Click on Activated.
  6. Set up your Wi-Fi name (SSID) and your Wi-Fi password.
  7. Click Next.
  8. Enter a new login password for your router for security.
  9. Click Finish.
  10. Now the GigaCube web interface opens.


Click to check more about Vodafone GigaCube Cat19 FAQs and User Manual

How to insert my SIM card into the Vodafone GigaCube CAT19?

  1. Open the micro SIM card cover on the bottom of the Vodafone GigaCube CAT19.
  2. Carefully insert the micro SIM card into the card slot until you hear a click.
    Your micro SIM card is already activated. You do not need a PIN when starting the GigaCube.
  3. Then shoot the micro SIM card cover.
  4. Connect the power supply to the router.

Good to know: If your Vodafone router is turned on, you must not insert or remove the micro SIM card. This may affect performance or damage the micro SIM card.

Click to check more about Vodafone GigaCube Cat19 FAQs and User Manual

Vodafone Gigacube Cat19 LED indicators lights and flashes means

LED indicator lights LED indicator flashes
Signal * No LED lights up: no mobile connection

* 1 green LED lights up: weak mobile radio reception

* 2 green LED lights: good mobile radio reception

* 3 green LED lights: very good mobile radio reception

LAN * No LED lightt: Ethernet cable not connected
* Green: Ethernet cable connected
Green: device connected, data transmission
Wireless Internet Access No LED is lit: 2.4 GHz and 5 GHz connections are closed * Green: WLAN switched on
* Fast Green: Connecting to 2.4 GHz or 5 GHz using WPS
Power * No LED lights up: GigaCube switched off
* Green: GigaCube switched on
Status * No LED is lit: connection to the data service is disconnected
* Green: data service is connected
Fast Green: Firmware Update
Mode LED Red = Error: This indicator is solid red when the CPE 1) maintains the offline mode while the temperature protection function is running or 2) the SIM card can not be identified. Or the PIN is not entered or the PIN check fails.
3) Or does not have access to the wireless network
Mode LED Cyan: 4G | LTE mode
Mode LED Blue: 3G mode
Mode LED Yellow: 2G mode


Check more about Vodafone GigaCube Cat19 FAQs and User Manual

FAQs for Vodafone GigaCube Cat19

Do the Vodafone GigaCube Cat19 support public IP addresses?

– No, public IP addresses are currently not supported. With the GigaCube rates, a private IP address is automatically stored.


Can I connect my landline telephone to the GigaCube?

– No, that will not work. The telephone connection on the GigaCube is shut down. There are no voice services for the GigaCube rate on the SIM card. You also can not use the GigaCube’s phone port with another SIM card with voice services.


Can I also use the GigaCube in my motorhome?

– Yes, with the Vodafone GigaCube you can even surf in the car, motorhome and camping.
You only need Vodafone mobile reception and a car converter for the cigarette lighter or 12V connection.
Or use the GigaCube external battery.


Does the GigaCube have voice recognition?

– No. You can only control and set it up via the GigaCube web interface.

More about this: How to set up your Vodafone Gigacube Cat19?

Alcatel EE60 4G LTE MiFi Hotspot Review

If you looking for a 4G mobile WiFi router for use with your data sim card and the 4G MiFi must have a low price and small size, we recommend you to consider the latest Alcatel EE60 Mobile WiFi. If you are unfamiliar with the Alcatel EE60 MiFi, you can proceed to read more about the Alcatel EE66 review in this article.

Why we need an LTE MiFi when the smartphone has the hotspot function?

Many people may ask, why do I need a MiFi device while the smartphone is equipped with hotspot function? MiFi (Mobile WiFi) supports WiFi data sharing with many other devices. Usually, a MiFi support 5-15 users at a time depending on the model and the MiFi brand. MiFi usually would not become very hot and does not consume the battery fast compared to when using a smartphone as a hotspot. WiFi signal access from a mobile WiFi is also extensive and the MiFi also can usually extend the signal better than smartphones and provides faster internet. If you only use 2-3 devices like 1 smartphone and 1 laptop, MiFi is not required. But if you use more than 3 devices and share data with many people then a MiFi is highly recommended.

Alcatel EE60 Review

We get the Alcatel EE60 MiFi a couple of days ago, comparing with other mobile device models such as Huawei E5577, TP-link M7350 and so on, the Alcatel EE60 is most budget one. The highlight of Alcatel EE60 is the large battery capacity, which can not only keep it working for a long time but also charge other devices if needed.


The size of the Alcatel EE60 is quite compact and can fit in the pocket. The USB type-c cable is provided for you to charge. The battery capacity of the EE60 is 5150mAh, quite large compared to most other MiFi which usually have a battery of about 1500 mAh – 3000 mAh only. You can also use this MiFi as a power bank using the USB port.


Unlike other Alcatel 4G routers, Alcatel EE60 uses Nano SIM card. And LTE signal access is also very good, if we place a SIM card in Android smartphones, we can only get 1-2 bar signals but using the Alcatel EE60, it can get full signal. Most functions can be accessed using the Alcatel Link app on Android and iOS.


Alcatel EE60 Settings

The Alcatel EE60 is also very easy to setup. For starters, you just need to login to 192.168.1.1 and setup the parameters if you need. You can only use 5Ghz WiFi in AC wireless mode, while 2.4Ghz wifi only in wireless mode b/g/n. No dual-band function.


This EE60 MiFi can also receive SMS using this Link application, just in case you want to use data SIM card to receive TAC or SMS verification from Whatsapp etc.


The Alcatel EE60 MiFi manual promotes the use of a charger that supports Qualcomm Quick Charge 2.0 for fast charging. If you use a normal charger adapter, it will take a long time to charge the battery for 5150 mAh full. In addition to the Quick Charge 2.0 charger, the iPad charger (Apple 12W charger) is also suitable for charging this MiFi. Make sure to remove pouch MiFi bags before charging to avoid accumulating heat and heat up.

Alcatel EE60 MiFi Highlights:

  • Unlocked model – supports all the network providers in Asia and Europe
  • Battery life throughout the day – 5150 mAh
  • A strong data signal, WiFi area
  • Supports wireless AC
  • Compact size
  • Can work as a mobile power bank
  • Supports Qualcomm Quick Charge 2.0 for fast charging


Alcatel EE60 MIFI Configuration

  • Does not support dual band wifi 2.5 GHz and 5 GHz simultaneously
  • Not sold in regular stores but online
  • Some users reportedly difficult to play PS4 online using this Mifi (NAT limitation).
  • The latest firmware version EE60_00_05.00_31 does not support the Alcatel Link App app on iOS and Android
  • Does not have Micro SD card slot
  • The size of a large MiFi battery means you cannot use a low adapter/charger output as the charge will take a long time and hot fast. Please use high adapter/charger output such as iPad charger


Alcatel EE60 Firmware Update

Avoid Alcatel EE60 Mifi firmware updates to the EE60_00_05.00_31 version because this firmware does not support the Alcatel Link App app on iOS and Android. Some users report the latest EE60 firmware more stable, fast and less hot but Link App app is not accessed at all. If you have updated to this new firmware and need Link application, we recommend email to this application developer to support EE60 Mifi again.


You can contact the app developer of the Link app on the Play Store site> Scroll down> Developer> Send email> specify app does not support firmware EE60_00_05.00_31. Based on our search, firmware EE60_00_05.00_31 launched for security fixes.


Since the MiFi EE60 is already an old model, we also recommend this TP-Link M7450 MiFi if you need advanced functionality like Cat 6 LTE with Carrier Aggregation and download speed up to 300Mbps. If you only plan to get a MiFi device at an affordable price, you can get the EE60 because of the many exciting functions with a budget price.

Huawei E5885 User Manual

This blog is about the Huawei E5885 user manual. The Huawei E5885Ls-93a user manual guides users to know the Huawei E5885. And the Huawei E5885 manual tells how to use and setup Huawei E5885 mobile hotspot.


Huawei E5885 Appearance

  1. WPS button: To connect a WPS-enabled device to your HUAWEI Mobile WiFi Pro2 using the WPS button. When WPS is enabled, press and hold the button for more than five seconds to set up a WPS connection.
  2. Screen
  3. Slot cover
  4. Power button: Press and hold to turn your HUAWEI Mobile WiFi Pro2 on or off.
  5. Lanyard hole
  6. Output charging port
  7. Micro USB port
  8. Ethernet port
  9. NFC sensor: Use NFC function to establish a Wi-Fi® connection.
  10. Reset button: Press and hold to restart your HUAWEI Mobile WiFi Pro2 and restore it to its factory settings.


Note: If you forget the username, password or SSID for your HUAWEI Mobile WiFi Pro2, try restoring the device to its factory settings.


Huawei E5885 SIM card and SD card Installation


Network connection

You can view the current SSID (Wi-Fi network name) and Wi-Fi network key on the screen.

We strongly recommend that you change the default SSID and Wi-Fi network key to keep your data secure.


HUAWEI Mobile WiFi Pro2 as a router


Use a network cable to reduce mobile data usage.

HUAWEI HiLink app


Download the HUAWEI HiLink app to manage your HUAWEI Mobile WiFi Pro2 more easily.

* Change the SSID and Wi-Fi network key.

* Check data traffic and SMS messages.

* Check roaming state and signal strength.


Note:

* You can also manage your HUAWEI Mobile WiFi Pro2 through the web interface at http://192.168.8.1. The default username and password is admin.

* Click Help in the upper right corner of the web interface to learn more about your HUAWEI Mobile WiFi Pro2.


Connect to Huawei E5885 Wi-Fi via NFC(optional)

If you are using a device (such as an Android phone or tablet) with NFC functionality, you can connect automatically to Wi-Fi by simply touching your device against the NFC sensor on the HUAWEI Mobile WiFi Pro2.


Before starting, make sure that your phone or tablet is unlocked and that NFC is enabled. Ensure that your HUAWEI Mobile WiFi Pro2 is powered on and that you have the HUAWEI HiLink app installed on your device.


  1. Touch your device against the NFC sensor on the HUAWEI Mobile WiFi Pro2, as shown in the following figure.

  1. When detection is successful, the HUAWEI HiLink app will automatically open on your device and you will be connected to Wi-Fi. The Wi-Fi icon should be visible in the status bar of your device if connection has succeeded.


Note:

* This feature is not available for iOS devices.

* If HUAWEI HiLink is not installed on your device, touching the device against the NFC sensor on the HUAWEI Mobile WiFi Pro2 will automatically bring up the Choose an action screen. From here, select New tag scanned (the name of this option may vary by device) and follow the link to download and install the HUAWEI HiLink app.

* You can also download and install HUAWEI HiLink by scanning the QR code in the HUAWEI HiLink app section of this manual. Alternatively, search for and download HUAWEI HiLink in Google Play or the HUAWEI App Center.


Huawei E5885 Wi-Fi extender (optional)

The Wi-Fi extender feature increases Wi-Fi coverage and connects to Wi-Fi networks where available to reduce mobile data usage.

On the HUAWEI HiLink app, enable the Wi-Fi extender function, and connect HUAWEI Mobile WiFi Pro2 to a Wi-Fi network.


Huawei E5885 Charging other devices


You can charge your phone or Bluetooth headset with the HUAWEI Mobile WiFi Pro2 using a charging strap or charging cable.


Method 1: Charging other devices using the charging strap

  1. Please open the charging strap as indicated in the figure.

Note: The charging strap is a standard accessory.


  1. Insert the charging strap in the port shown in the figure.

Method 2: Charging other devices using a charging cable

Note: Your HUAWEI Mobile WiFi Pro2 will not be able to charge other devices when it has a low battery or is overheating.


Huawei E5885 Power Charging

Please only use compatible chargers provided by a designated manufacturer.


Note: The charger is an optional accessory. To buy a charger, please contact an authorized retailer.


User Tips for Huawei Mobile WiFi Pro2:


  1. Why isn’t my HUAWEI Mobile WiFi Pro2 responding?

> Try restarting the device. If that doesn’t work, restore the device to its factory settings.


  1. Why can’t I connect to my HUAWEI Mobile WiFi Pro2 sometimes?

> To save power, your HUAWEI Mobile WiFi Pro2’s Wi-Fi auto off feature is designed to turn off Wi-Fi when there haven’t been connections for a while. You can press the POWER button to turn on Wi-Fi again. Alternatively, you can disable this feature, although this might impact battery life. Log in to the web interface and disable the Wi-Fi auto off feature.


  1. Why won’t my HUAWEI Mobile WiFi Pro2 connect to a network even though all the settings are correct?

> The PIN verification feature might be enabled. Launch HUAWEI HiLink and enter the correct PIN.

> You can disable this feature if you find entering the PIN regularly inconvenient.

> From the HUAWEI HiLink app, select Settings and then disable the PIN verification feature.


  1. Why can’t I access the web interface at 192.168.8.1?

> This is likely due to an IP address conflict when the HUAWEI Mobile WiFi Pro2 assigns itself a new IP address. Please try 192.168.9.1 in this case. If your HUAWEI Mobile WiFi Pro2 has an LCD screen, the new IP address of your web interface will be displayed.


  1. Why won’t my HUAWEI Mobile WiFi Pro2 power on?

> Your battery is probably out of power.

> Charge your HUAWEI Mobile WiFi Pro2 for a while and power it back on.


  1. Why did my HUAWEI Mobile WiFi Pro2 power off all of a sudden?

> Your HUAWEI Mobile WiFi Pro2 may overheat when you use it continuously over a long period of time, and thereby trigger its automated protection system. Wi-Fi will be turned off and your HUAWEI Mobile WiFi Pro2 will power off if this occurs.

> Please ensure the device is properly ventilated and cooled before you power it on again.


Check more about Huawei E5885 features here: https://www.4gltemall.com/huawei-mobile-wifi-pro-2.html

Huawei B618s-22d Firmware Versions and Update

Many people are using the Huawei B618s-22d LTE router and somebody may have the demand to update the Huawei B618s-22d firmware. Below is the collection of the Huawei B618s-22d firmware for download. And there are instructions for updating the Huawei B618 firmware and some important information for updating the firmware.


Warning: Use the firmware at your own risk! No liability is accepted for the use of the data provided and any damage to the device!


Unbranded Huawei B618s-22d original firmware versions:

B618_UPDATE_11.181.99.06.00.BIN

B618_UPDATE_11.185.01.00.00.BIN

B618_UPDATE_11.192.00.00.00.BIN

B618_UPDATE_11.192.01.00.00.BIN

B618_UPDATE_11.195.03.00.00.BIN

B618_UPDATE_11.192.01.00.00-debug.BIN


Providers related firmware versions for Huawei B618:


B618_UPDATE_11.189.00.00.154.BIN (CH, Sunrise)

B618_UPDATE_11.189.00.01.55.BIN (DE, Telekom)

B618_UPDATE_11.192.01.00.55.BIN (DE, Telekom)

B618_UPDATE_11.193.00.00.104.BIN (DNK, Telmore)

B618_UPDATE_11.192.00.01.170.BIN (Turkey)

B618_UPDATE_11.192.01.01.170.BIN / Turkey)

B618s-22d_Update_11.185.01. 01.264.bin (PL, Play)

B618_UPDATE_11.192.01.00.264.BIN (PL, Play)


modded firmware:


B618s-22d_Update_11.195.03.00.00_M_AT_04.01.bin

B618s-22d_Update_11.195.03.00.00_M_AT_04.01.exe

B618s-22d_Update_11 .195.03.00.00_M_AT_04.02


Balong Flash + Tools


B618 Balong Flash Package @ mobil.zip

Change_IMEI_2018_02_24.zip

fix_ttl_b618s_01.zip

repair_nvram_b618_01.zip

unlock B618s_01.zip

usbloader_B618_2018-03-07.rar


Instruction of reflashing Huawei B618 LTE router (updating the Huawei B618s-22d firmware):

  1. Install drivers (all standard, as for other Huawei devices, you will find yourself) Download the attached archive and unpack it.
  2. We connect the B618 via USB to the computer.
  3. We close BOOT and GND, hold and supply power, release the closed contact, 1 port appears in the Device Manager.
  4. From the folder load_usbloader_to_B618run go.cmd wait until the boot loader is fully loaded (oil is oiled) and 2 ports will appear.
  5. From the flash_via_balongflashfolder, we run go.cmd, thereby flashing the firmware which is in this folder, in this case the “ammo” is the firmware B618_UPDATE_11.195.03.00.00.BIN. If you want to fill in another firmware (for example, modified with the option unlock, change IMEI and fix TTL), then put the desired firmware in this folder, after removing B618_UPDATE_11.195.03.00.00.BIN. From there, confirm the desire to reflash by pressing the key.
  6. Restart the router (do not forget to connect ethernet cable instead of USB)


By the way, you can use the Change_IMEI_2018_02_24.zip to change the Huawei B618 IMEI number. And the fix_ttl_b618s_01.zip could be used to controlling the TTL commit for Huawei B618.

Huawei B618 LTE Router User Manual

Many people are already getting or planning to get the Huawei B618 4G LTE Advanced Pro router, but many users may want to know how to use or setup the Huawei B618 router. Today, we will guide you know the Huawei B618 and use the Huawei LTE router well.


Getting to know your LTE CPE B618

Note:

* During thunderstorms and rainy weather, turn off and disconnect the LTE CPE B618.

* The LTE B618 CPE function descriptions and illustrations in this article are for your reference only. The product you have purchased may vary.


Application scenario

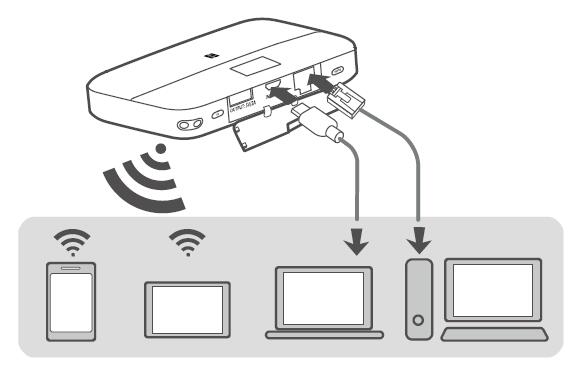
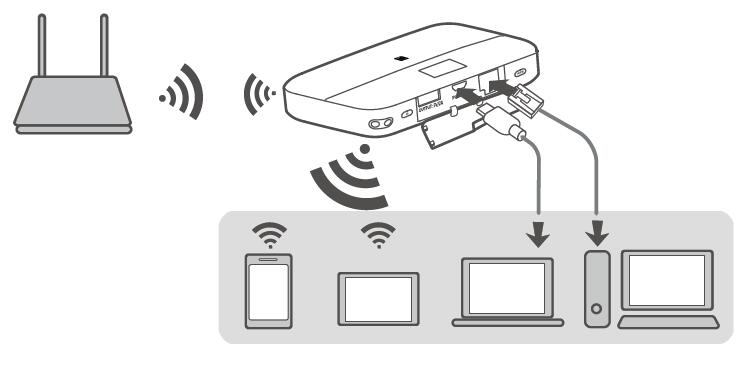
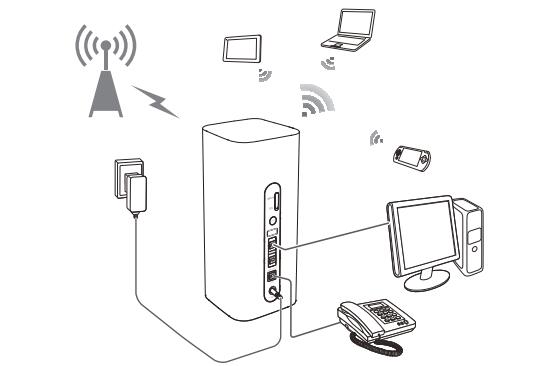
The Huawei B618 LTE CPE can:

* Provide Internet access for Wi-Fi® devices and a computer.

* Connect to a telephone for voice services.

* Expand LAN coverage together with a hub or a switch.


Note:

When the Huawei LTE CPE B618 is in use, you can alter its position or orientation to improve signal reception.


Selecting the installation environment Obstacles such as concrete and wooden walls will affect the transmission of the network signal. It is recommended that when you install LTE CPE you choose an open space. Keep the LTE CPE away from equipment that generates strong magnetic and electric fields, for instance microwaves, refrigerators, and satellite receivers.
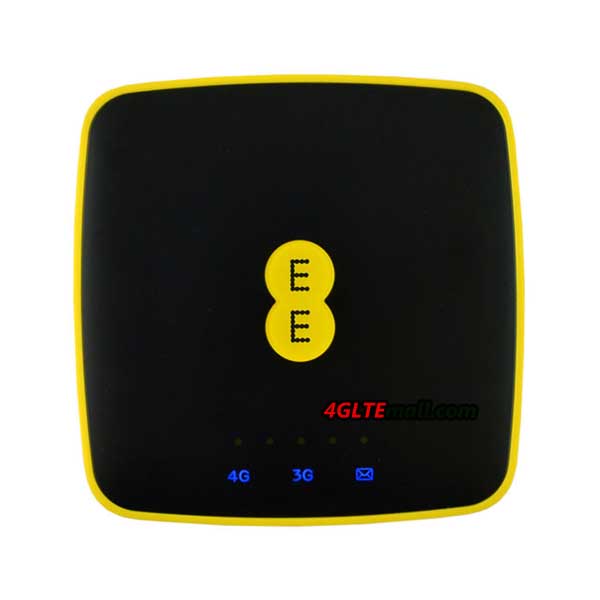
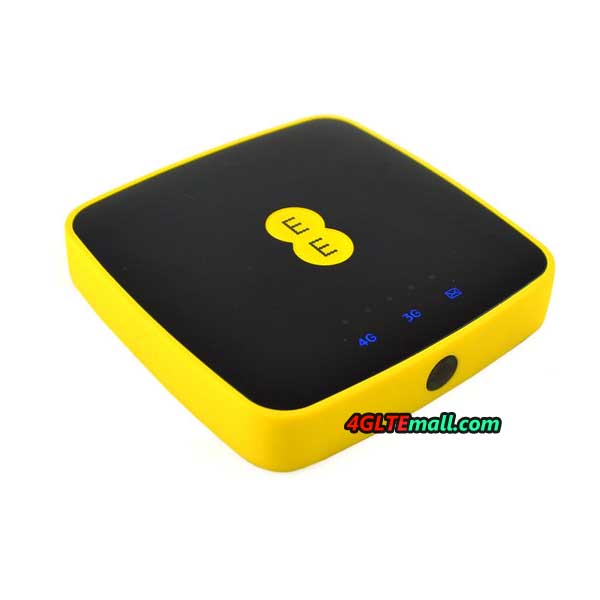
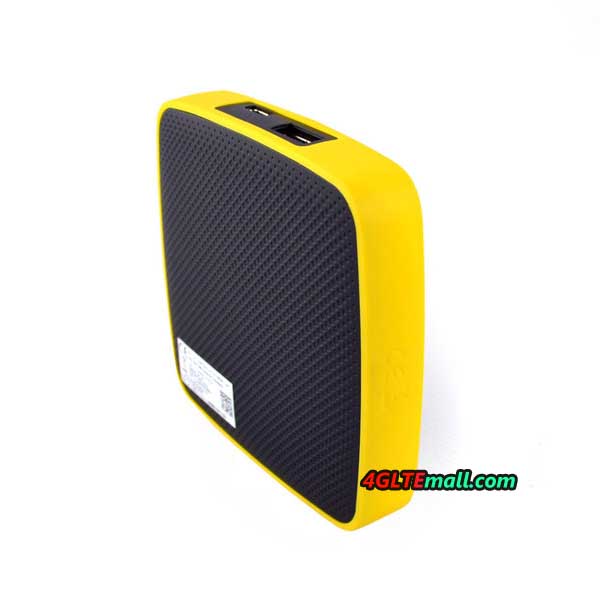
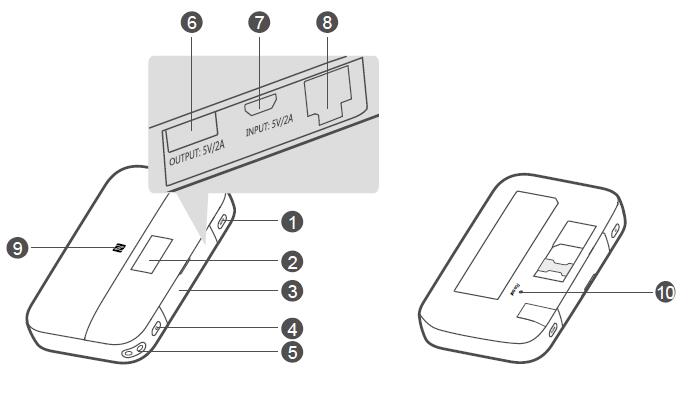
 

Appearance

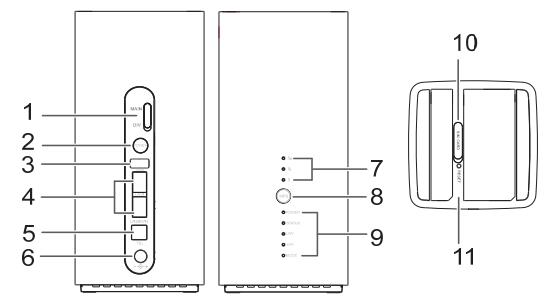
  1. External antenna sockets (* Connect to external antennas).
  2. Power button Press and hold to power the B618 on or off.
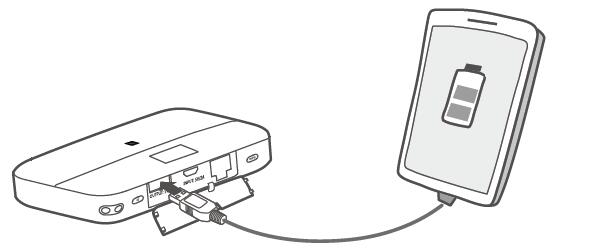
  3. USB port Connect to a USB device.
  4. WAN/LAN port

– Working as a LAN port when connected to a computer, switch, or other LAN device.

– Working as a WAN port when connected to an Ethernet port on the wall.

  1. Landline phone port Connect to a telephone.
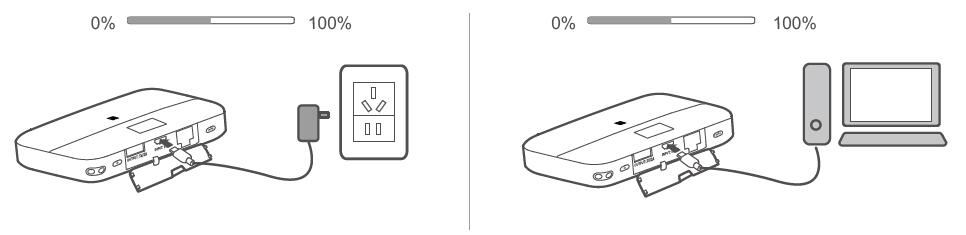
  2. Power input Connect to compatible power adapter.
  3. Signal indicators Green: signal reception available (more indicators mean better reception).
  4. WPS button Press and hold to active WPS connection when Wi-Fi is turned on.
  5. Indicators
  6. Micro-SIM card slot Accommodate a micro-SIM card.
  7. RESET button Restore the LTE CPE to its factory settings.


* Power LED indicator

Off: Power off.

On: Power on.


* Status LED indicator

Off: Data server connection is disconnected.

Blinking in green: Firmware update.

Green: Get IP address of WAN.


* LAN LED indicator

Off: No device is connected to a LAN port.

Blinking: data is being transmitted through a LAN port.

Green: At least one of the LAN ports is connected to a device.


* Wi-Fi LED indicator

Off: Both 2.4G and 5G Wi-Fi is closed.

Blinking in green: WPS open.

Green: Both or one of the 2.4G and 5G Wi-Fi is opened.


* Mode LED indicator

Steady cyan/blue/ yellow: connected to a mobile network.

Steady green: connected to an Ethernet network.

Steady red: The SIM card is not recognized, the PIN has not been entered, or the PIN verification failed.


Huawei B618 Setup

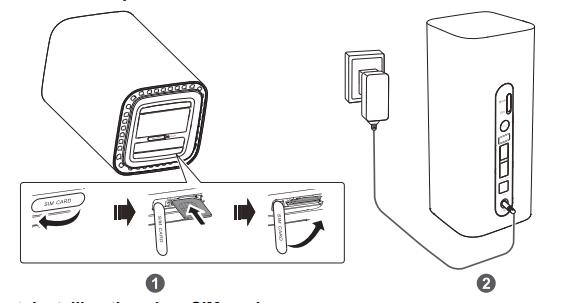
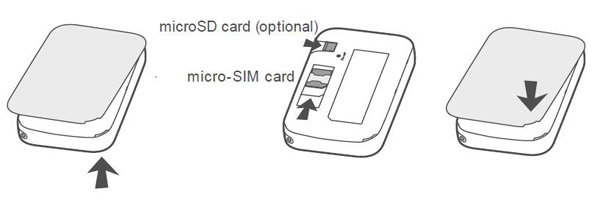
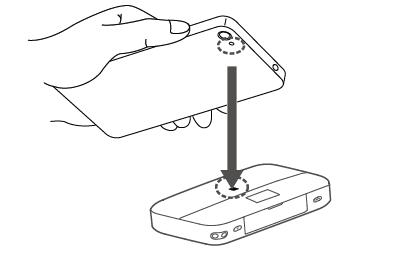
  1. Installing the micro-SIM card Install the micro-SIM card according to the illustration.

– Note: When removing the micro-SIM card, gently press the micro-SIM card in, then release. The card will automatically pop out.

– Do not remove the micro-SIM card when the LTE CPE is powered on. Doing so will affect the performance of your LTE CPE, and data stored on the micro-SIM card may be lost.


  1. Connecting to a power adapter

– Install the power adapter according to the illustration.


Note: Use the provided power adapter. Use of an incompatible power adapter or one from an unknown manufacturer may cause the LTE CPE to malfunction, fail, or could even cause a fire. Such use voids all warranties, whether expressed or implied, on the product.


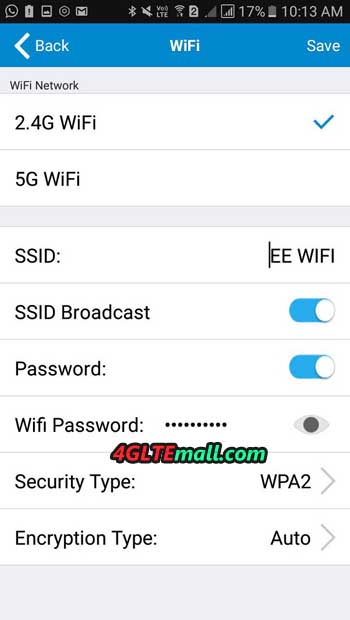
Connecting to your LTE B618 router’s Wi-Fi network

Once the router has connected to a mobile data network, you can connect your computer or mobile phone to the router’s Wi-Fi network to access the Internet. Please refer to the label on the bottom of the router for the default wireless network name (SSID) and password (Wi-Fi KEY).

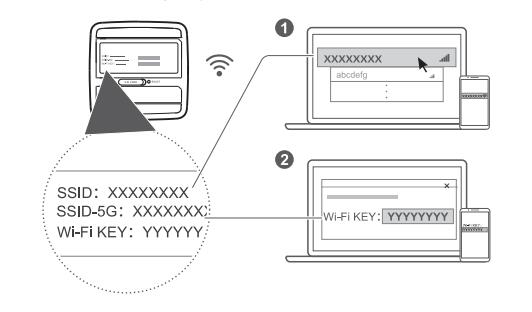
Note: 1.) When the Wi-Fi LED indicator is steady on, Wi-Fi is enabled. To enable or disable Wi-Fi, refer to the help section on the router’s web-based management page. 2.) Ensure that you promptly change the Wi-Fi network name and password on the web-based management page to prevent unauthorized access to your Wi-Fi network. Once you have changed the password, you will need to reconnect to the router’s Wi-Fi network.


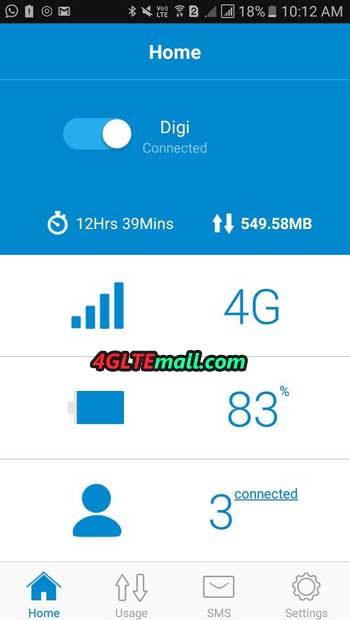
Configuring your Huawei B618 router

You can configure the router using the web-based management page. Please refer to the label on the bottom of the router for the default IP address, user name, and password. More information can be found in the help section of the web-based management page.

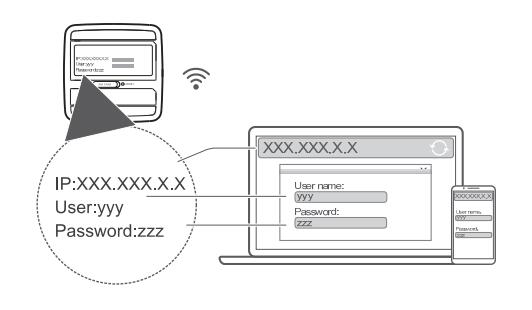
Note: You will be prompted to change the default login password for the web-based management page to prevent unauthorized users from changing the router’s settings.


Optional configurations

Note: The features described in this section are for reference purposes only. Your router may not support all of these features.

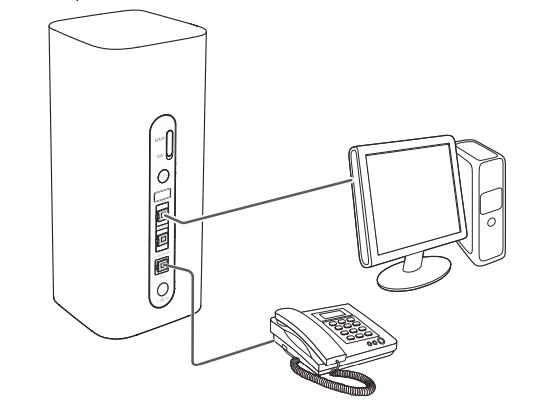
  1. Connecting multiple devices You can connect a computer, or landline phone to the router to access the Internet, make telephone calls, and more.
  2. Installing external antennas You can install external antennas to improve signal reception. Please contact your network service provider to purchase the antennas.

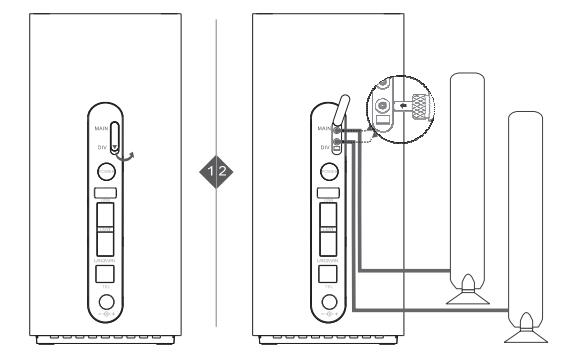
Note: Turn off the router and unplug the power adapter before installing any external antennas. External antennas are only suitable for indoor use. Do not use external antennas during thunderstorms. Only use external antennas provided by your network service provider.


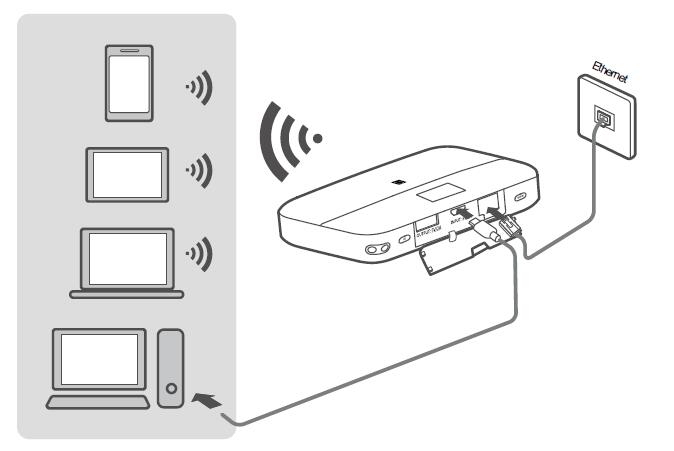
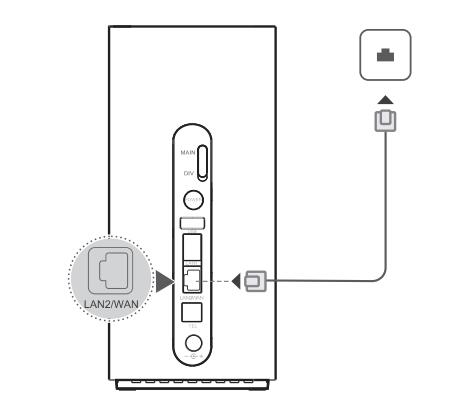
  1. Accessing the Internet through an Ethernet port

You can connect the router to a wall-mounted Ethernet port using an Ethernet cable to connect to the Internet when you have used up your data allowance. Configure the relevant settings on the web-based management page before connecting to the Internet through an Ethernet port. More information can be found in the help section of the web-based management page.

  1. Restoring to Factory Settings

If you forget some configuration parameters, you can restore the LTE CPE to its factory settings and then configure the LTE CPE again. Use a sharply pointed object to press and hold the RESET button until the Power indicator turns off. The LTE CPE is then restored to its factory settings.


Note: After you carry out this operation, the LTE CPE’s personal configuration parameters will all be deleted. All configurations on the web management page will be restored to the factory settings.


  1. Establishing a WPS Connection

If the Wi-Fi device to be connected to the LTE CPE supports WPS, the wireless network encryption key is generated automatically and there is no need to enter it manually. The steps for WPS connection are as follows: 1.) Turn on the CPE. 2.) Turn on the Wi-Fi device to be connected to the LTE CPE. 3.) Activate the LTE CPE’s WPS. 4.) Activate the Wi-Fi device’s WPS.


Note: Press and hold the WPS button for two to five seconds to set up a 2.4 GHz WPS connection, or press and hold the button for more than five seconds to set up a 5 GHz WPS connection. For specific instructions for the Wi-Fi device, refer to the device’s user manual.


  1. Downloading Huawei HiLink App

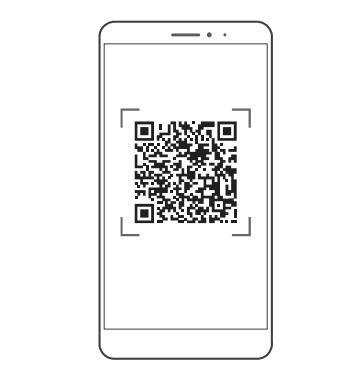
Scan the QR code to download the Huawei HiLink App and configure the router from your phone.