This chapter explains how to manage your Nighthawk M1 mobile router Internet connection.
The chapter covers the following topics:
- View Your Data Usage
- Offload Your Mobile Internet Connection
- Specify Cellular Settings
- Enable VPN Service
View Your Data Usage
You can view an estimate of your data usage on the mobile router LCD, from the NETGEAR Mobile app, and on the mobile router web page.
To find out how to manage your data, visit telstra.com/yourdata.
View Data Usage on the Mobile Router LCD
To wake the device, press the Power button.
The LCD shows the estimated data usage for the current billing cycle.
View Data Usage from the NETGEAR Mobile App
To view estimated data usage from the NETGEAR Mobile app:
- On your smartphone, connect to the mobile router’s WiFi network.
- Launch the NETGEAR Mobile app.
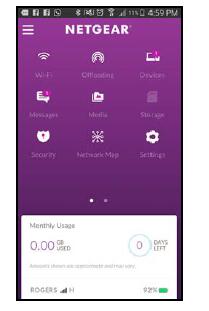
The app shows the estimated data usage for the current billing cycle.
View Data Usage from a Web Browser
You can log in to the mobile router from a computer using a web browser.
To view estimated data usage information on the mobile router web page:
- From a computer that is connected to your network, launch a web browser.
- Enter http://m.home or http://192.168.1.1.
A login page displays.
- Enter the administrator login password.
The password is case-sensitive.
The mobile router dashboard displays the estimated data usage in the right pane.
- To view more details, click the CHECK MY ACCOUNT link.
Offload Your Mobile Internet Connection
Data offloading lets you transfer the mobile router’s Internet connection from mobile broadband to another WiFi or Ethernet connection. Data offloading reduces the amount of data that you are using on the cellular band. You might want to use this feature if you are in an area in which many others are using cellular connections at the same time or in areas with poor cellular reception.
During Ethernet offloading, you can use the micro USB port for AC charging and you can use the USB type A port to jump boost a device or to connect a USB device.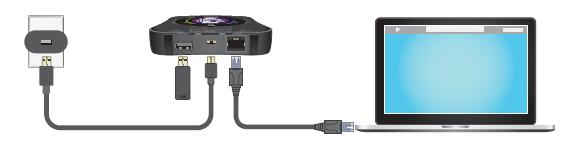
If you want to use a tethered connection and offload, use WiFi offloading. You cannot use an Ethernet connection and a tethered connection at the same time.
Turn On Data Offloading From the NETGEAR Mobile App
To turn on data offloading:
- Launch the NETGEAR Mobile app on your smartphone.
- Swipe down.
The dashboard displays.
- Tap Offloading.
The Offloading page displays.
- Select WiFi.
The Offloading page displays a list of WiFi networks in your area.
- To connect to a network on the list, do the following:
a. Tap a WiFi network.
b. When prompted, enter the password for the WiFi network and tap CONNECT.
6. To join another WiFi network that is not in the list, do the following:
a. Tap Join Network.
b. When prompted, type the network name and the password.
c. Tap CONNECT.
7. To offload to a preferred network, do the following:
a. Tap Preferred Networks. A list of preferred networks displays.
b. Select the network and enter the password.
c. Tap CONNECT.
When the hotspot is offloading the Internet connection, the WiFi icon is bright blue and displays the signal strength. The screen displays the SSID of the active WiFi network.
Turn On Data Offloading from a Web Browser
To turn data offloading on or off:
- From a computer that is connected to your network, launch a web browser.
- Enter http://m.home or http://192.168.1.1.
A login page displays.
- Enter the administrator login password.
The password is case-sensitive.
The dashboard displays.
- Select Setting > Setup > Data Offloading.
The Data Offloading page displays.
- Select the Enable check box.
- Select the WiFi or Ethernet radio button.
- To use WiFi offloading, enter the WiFi network name and WiFi password.
- Click the Apply button.
Your settings are saved.
Specify Cellular Settings
You can specify cellular network settings for the mobile router.
Specify Cellular Settings from the NETGEAR Mobile App
To specify cellular settings:
- On your smartphone, connect to the mobile router’s WiFi network.
- Launch the NETGEAR Mobile app.
- Swipe down.
The dashboard displays.
- Tap Settings > Cellular.
The Cellular page displays. Domestic Data is selected by default.
- To turn domestic data on and off, tap Domestic Data.
- To turn roaming on and off, tap International Roaming.
- To add an APN, do the following:
a. Tap APN.
b. Tap +.
The Add a new APN page displays.
c. Complete the settings.
d. Tap Add.
The APN is added.
Specify Cellular Settings from a Web Browser
To specify cellular settings:
- From a computer that is connected to your network, launch a web browser.
- Enter http://m.home or http://192.168.1.1.
A login page displays.
- Enter the administrator login password.
The password is case-sensitive.
The dashboard displays.
- Select Settings > Advanced Settings > Cellular.
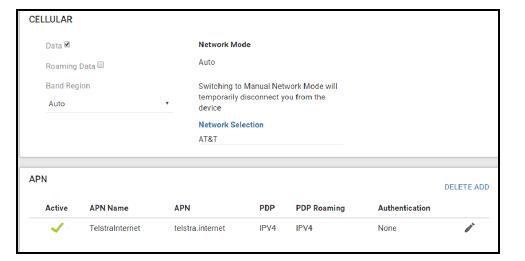
- Change the settings as needed.
- To add an APN, do the following:
a. Click the ADD button.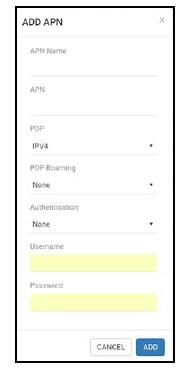
b. Complete the fields.
c. Click the ADD button.
The Cellular page displays the APN.
d. To make this APN active, click the Edit icon for this APN.
The Edit APN page displays.
e. Select the Active check box.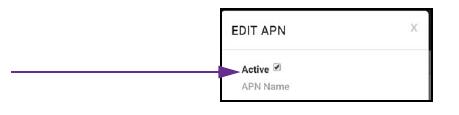
f. Click the SAVE button.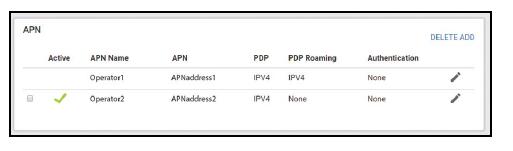
This APN is now the active APN. The Cellular Settings page displays a green check mark next to the active APN.
- Click the Apply button.
Your settings are saved.
Enable VPN Service
To connect to a corporate network using VPN, you must first enable VPN service.
Enable VPN Service from a Web Browser
To enable VPN service:
- From a computer that is connected to your network, launch a web browser.
- Enter http://m.home or http://192.168.1.1.
A login page displays.
- Enter the administrator login password.
The password is case-sensitive.
The dashboard displays.
- Select Settings > Advanced Settings > Other.
- Select the VPN Service Enable check box.
- Click the Apply button.
Your settings are saved.